Governance is not about limiting freedom. The point is to be able to
manage Teams while removing chaos and sprawl so users can work in a
compliant fashion that does not affect their day to day productivity.
This blogs walks you with various controls available to better govern
Microsoft Teams.
You need to remember that Microsoft Teams is built on top of Office365
Groups. So, Microsoft Teams uses the Office365 Group settings and
policies in the background.
Some of the Teams governance controls discussed in this blog are
- Restrict Office 365 Group Creation to set of users
- Office 365 Group Expiration Policy
- Check for Teams without Owners
- Check for inactive Teams
- Guest Access in Teams
- Teams Classifications
- Retention Policy
- New Teams Admin Roles
- Office 365 Group Naming Policy
- Show Teams in GAL
Restrict Office 365 Group Creation to set of users
By default, all the users in your Office365 tenant can create Microsoft
Teams. According to your organisation needs you can restrict the Teams
creation permission to set of users say Full Time Employees or Managers
using Dynamics Office groups. This feature requires Azure AD P1 license.
                            Function GroupCreators
                            {
                                param(
                                    [Parameter(Mandatory=$True)]
                                    [string]$securityGroup
                                    )
                                #get the Security Group
                                Get-AzureADGroup -SearchString $securityGroup

                                #use the settings template and get template group.unified
                                $Template = Get-AzureADDirectorySettingTemplate | where {$_.DisplayName -eq 'Group.Unified'}
                                $SettingsCopy= $Template.CreateDirectorySetting()
                                $SettingsCopy= Get-AzureADDirectorySetting -Id (Get-AzureADDirectorySetting | where -Property DisplayName -Value "Group.Unified" -EQ).id

                                #group creation allowed for all members at default make it false
                                $SettingsCopy["EnableGroupCreation"] = $False

                                #assign group of people(security group) to create group
                                $SettingsCopy["GroupCreationAllowedGroupId"] = (Get-AzureADGroup -SearchString $securityGroup).objectid

                                #apply the setting to azure directory setting
                                Set-AzureADDirectorySetting -Id (Get-AzureADDirectorySetting | where -Property DisplayName -Value "Group.Unified" -EQ).id -DirectorySetting $SettingsCopy
                                (Get-AzureADDirectorySetting).Values
                            }

                            # Connecting AzureADPreview Module, if AzureADPreview Module not avaiale in your machine, you can install using this command "Install-Module AzureADPreview"
                            Connect-AzureAD
                            GroupCreators -securityGroup "SecurityGroupName"
Refer
here
for more details.
Now we have provided the users with permission to create Teams. How you
can monitor whether the Teams created is used or it is just dormant?.
Below are the ways to control it.
- Set Office365 Group Expiration Policy
- Check for Teams without Owners
- Check for inactive Teams
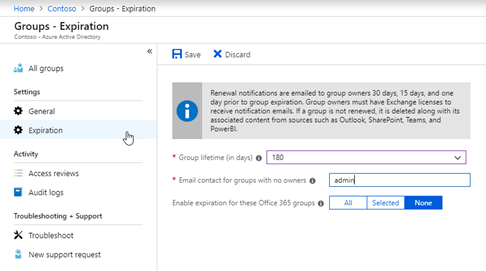
Office 365 Group Expiration Policy
You can set a default group expiration as 180 days. After 180 days, the
Team owner will receive a notification that the Team is going to expire
with an option to renew it. This feature requires Azure AD P1 license.
Check for Teams without Owners
Always assign at least two owners for groups. There are two ways to do
it. You can check from the Teams Admin Centre.
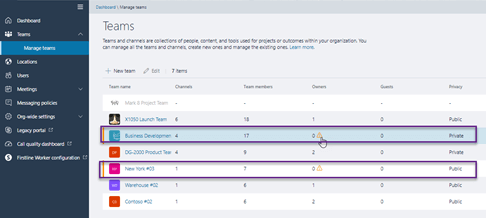
Or schedule the below script to return you the Teams without Owners
regularly(weekly/monthly).
                Function GetTeamsWithOutOwners
                {
                    param(
                           [Parameter(Mandatory=$True)]
                                [string]$Path
                         )
                    #install-module microsoftteams
                    Connect-MicrosoftTeams

                    $teams= get-team
                    $teams | ForEach-Object{
                        $team=$_
                        $teamOwner=Get-TeamUser -GroupId $team.GroupId -Role owner
                        if($teamOwner -eq $null)
                        {
                             New-Object -TypeName PSObject -Property @{
                             TeamName = $team.displayname
                             }
                        }
                    }|select TeamName|Export-Csv $Path -NoTypeInformation
                }
                GetTeamsWithOutOwners -Path C:TeamsWithoutOwnersList.csv
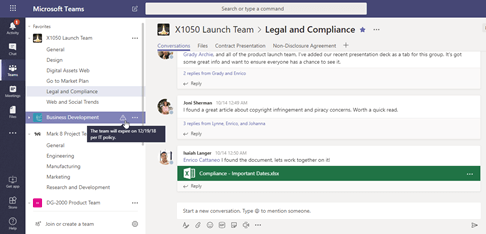
Check for inactive Teams
There is no direct way to check for inactive Teams. It is difficult to
define inactivity universally, since there are Teams with conversations
alone, Office365 Groups with SharePoint file activities or group
conversations alone. There is a nice script available in
TechNet,
you can download and modify the script as per your need.
Guest Access in Teams
Now comes the important part. To enable guest access in Teams you need
to first enable guest access in Azure AD, second on Office 365 Groups
settings and finally on individual Teams. From the Teams admin centre,
you can check the number of guest on each team. If you want a report of
guests across each team, use the below script.
                #Get guest users in a team
                Function Teams-GuestUser
                {
                    param(
                           [Parameter(Mandatory=$True)]
                                [string]$Path
                         )
                    $teamname= "Team Name"
                    $guestUPN= "Guest MailId"
                    #install-module microsoftteams
                    Connect-MicrosoftTeams

                   #Get all the teams
                    $teams= get-team
                    $exportGuest=$teams | ForEach-Object{
                        $team=$_

                            #Get guest from each team by giving role as guest
                        $guestTeam=Get-TeamUser -GroupId $team.GroupId -Role Guest
                             #if team has guest then export team name with guest mailid
                        if($guestTeam -ne $null)
                        {
                             New-Object -TypeName PSObject -Property @{
                             $teamname = $team.displayname
                             $guestUPN = $guestTeam.user -replace '#[^#]+.com','' -replace '#[^#]+T','' -replace '_','@' -join ", "
                             }
                        }
                    }|select $teamname,$guestUPN|Export-Csv $Path -NoTypeInformation
                }
                Teams-GuestUser  -Path C:teamsguestuser.csv
Checklist on how to enable guest access in Teams.
https://docs.microsoft.com/en-us/microsoftteams/guest-access-checklist
You can control the guest permissions on Teams meeting and messaging
from the Teams Admin centre.
https://admin.teams.microsoft.com/company-wide-settings/guest-configuration
Teams Classifications
You may come across scenario, as an admin you might want to strict the
guest access for few confidential projects. But can’t manually check on
it in regular basis, in such scenarios Office365 Groups classification
helps you.
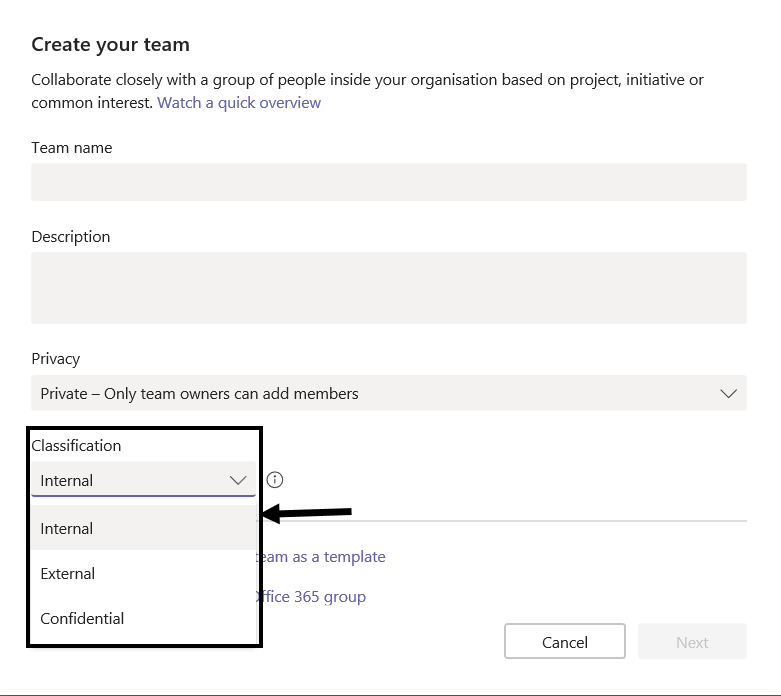
You can apply classification for Office365 Groups like Confidential,
External, Internal etc. Adding a classification to Office365 Groups does
not make any effect apart from showing it GUI. But once you classify
groups, you can restrict the guest access, change the meeting policies
etc according to the classification.
Below script helps you create classifications for Office365 Groups. By
default classification list is empty, you need to create the list using
powershell.
                #This script requires AzureADPreview module, install if not available already
                #install-module AzureADPreview
                #Connect to AzureAD
                Connect-AzureAD
                #Get AzureAD group setting for classification
                $setting = Get-AzureADDirectorySetting | Where-Object -Property DisplayName -Value "Group.Unified" -EQ
                if($setting)
                {
                    #If directory settings is already is available, add your classification types
                    $setting["ClassificationList"] = "Internal,External,Confidential"

                    #Make "Internal" as the default classification
                    $setting["DefaultClassification"] = "Internal"

                    Set-AzureADDirectorySetting -Id $setting.Id -DirectorySetting $setting
                }
                else
                {
                    #Create a new directory setting if already one not available
                    $settingTemplateId = Get-AzureADDirectorySettingTemplate | where {$_.DisplayName -like "Group.Unified"} | Select-Object Id
                    $Template = Get-AzureADDirectorySettingTemplate -Id $settingTemplateId.Id
                    $templateSetting = $Template.CreateDirectorySetting()

                    # Create the required classification types
                    $templateSetting["ClassificationList"] = "Internal,External,Confidential"

                    #Make "Internal" as the default classification
                    $templateSetting["DefaultClassification"] = "Internal"

                    New-AzureADDirectorySetting -DirectorySetting $templateSetting
                }
Once you set the classification list, it will be shown during Teams
creation.
Script to block guest access based on Teams classification.
                #This script requires AzureADPreview module, install if not available already
                #install-module AzureADPreview

                #Connect to AzureAD
                Connect-AzureAD

                #Connect to Exchange Online module
                $UserCredential = Get-Credential
                $Session = New-PSSession -ConfigurationName Microsoft.Exchange -ConnectionUri https://outlook.office365.com/powershell-liveid/ -Credential $UserCredential -Authentication Basic -AllowRedirection
                Import-PSSession $Session -DisableNameChecking

                $groupSettingsTemplate = (Get-AzureADDirectorySettingTemplate | ? {$_.DisplayName -eq "Group.Unified.Guest"})
                $Groups = (Get-UnifiedGroup -ResultSize Unlimited | Where {$_.Classification -eq "Confidential"})
                ForEach ($Group in $Groups)
                {
                    $groupSettings = Get-AzureADObjectSetting -TargetType Groups -TargetObjectId $Group.ExternalDirectoryObjectId
                    if($groupSettings)
                    {
                        # If policy already exists for the group, set the group settings object
                        $groupSettings["AllowToAddGuests"] = $False
                        Set-AzureADObjectSetting -Id $GroupSettings.Id -DirectorySetting $GroupSettings -TargetObjectId $Group.ExternalDirectoryObjectId -TargetType Groups
                        Write-Host "Guest access blocked for" $Group.DisplayName
                    }
                    Else
                    {
                        # If group settings does not exists, create a new settings object and update
                        $Settings = $groupSettingsTemplate.CreateDirectorySetting()
                        $Settings["AllowToAddGuests"] = $False
                        New-AzureADObjectSetting -DirectorySetting $Settings -TargetObjectId $Group.ExternalDirectoryObjectId -TargetType Groups
                        Write-Host "Guest access blocked for" $Group.DisplayName
                    }
                }
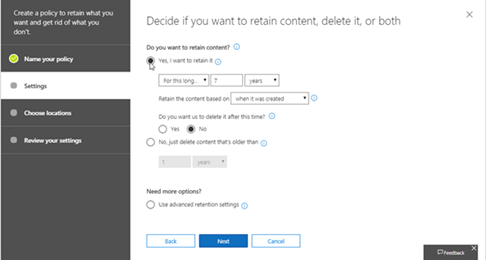
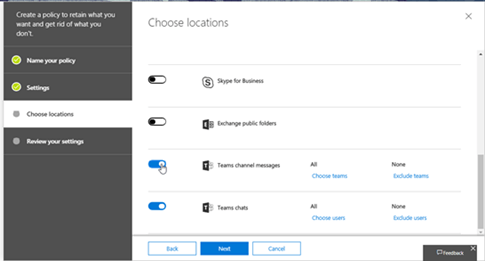
Retention Policy
You can set the retention policies for Teams team conversations and chat
messages.
For more information, check
here
New Teams Admin Roles
Below are new Teams administrator roles added. For more information
check
here.
- Teams Service Administrator: The overall Teams workload admin, who
can manage Office365 Groups also. - Teams Communication Administrator: Can manage meeting and calling
functionality in Teams. - Teams Communications Support Engineer: Access to advanced call
analytics tool. - Teams Communications Support Specialist: Access to basic call
analytics tool.
Office 365 Group Naming Policy
There are few organisations, where they need to follow strict naming
conventions or avoid using list of words in the group name. Using
Office365 Group Naming Policy, you can
- Set format for group prefix and suffix
- Create a list of blocked words which are not allowed in group names
For more information refer this Microsoft
documentation.
Show Teams in GAL
By default, when you create a new team, the corresponding Office365 is
not shown in Global Address List, if you want to show in SPO, Exchange
and other places, you need to set HiddenFromAddressListsEnabled to
True.
Set-UnifiedGroup -Identity GroupName -HiddenFromAddressListsEnabled $True