Microsoft added a new compliance feature, which is communication compliance. Using this feature, we can detect the communication risks in our organization. Communication compliance provides a predefined policy and a custom policy which will detect the inbound and outbound communication in Microsoft Teams, Exchange Online, Skype for Business Online, Third-party sources.
In this blog, we will cover the Prerequisites and creating policy from inbuild templates and custom policy.
Prerequisites
Before going to use, we need following prerequisites, that is
- License for Compliance feature
- Permission for reviewers
- Enable audit log
License for Compliance feature
Communication compliance feature required must have one of the following subscriptions or add-ons:
- Microsoft 365 E5 subscription (paid or trial version)
- Microsoft 365 E3 subscription + the Microsoft 365 E5 Compliance add-on
- Microsoft 365 E3 subscription + the Microsoft 365 E5 Insider Risk Management add-on
- Microsoft 365 A5 subscription (paid or trial version)
- Microsoft 365 A3 subscription + the Microsoft 365 A5 Compliance add-on
- Microsoft 365 A3 subscription + the Microsoft 365 A5 Insider Risk Management add-on
- Microsoft 365 G5 subscription (paid or trial version)
- Microsoft 365 G5 subscription + the Microsoft 365 G5 Compliance add-on
- Microsoft 365 G5 subscription + the Microsoft 365 G5 Insider Risk Management add-on
- Office 365 Enterprise E5 subscription (paid or trial version)
- Office 365 Enterprise E3 subscription + the Office 365 Advanced Compliance add-on (no longer available for new subscriptions, see note)
Permission for reviewers:
By default, Global Administrators do not have access to communication compliance features. The reviewers need some of the below roles to investigate and remediate messages.
- Supervisory Review Administrator,
- Case Management,
- Compliance Administrator,
- Review
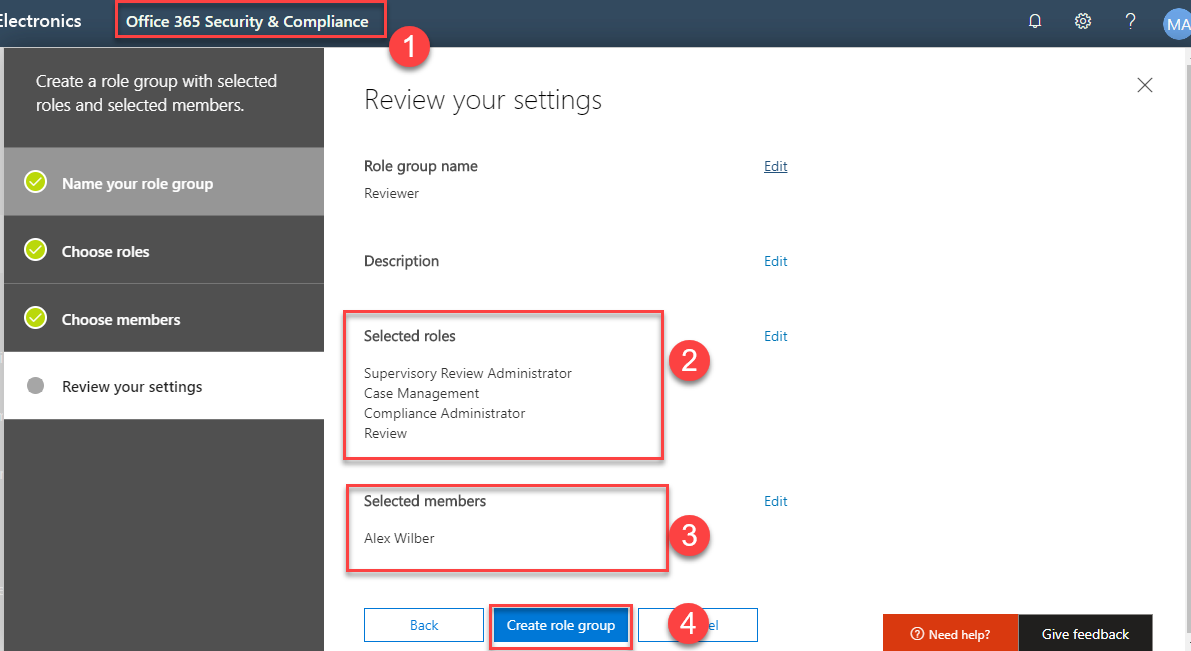
How to create a new role group for the reviewers?
Sign-in into Office 365 Security & Compliance https://protection.office.com/permissions with admin account → Go to Permissions → Create a policy → Add following role Supervisory Review Administrator, Case Management, Compliance Administrator, Review → Assign the members whom you want to include as reviewers → Click Create Role group.
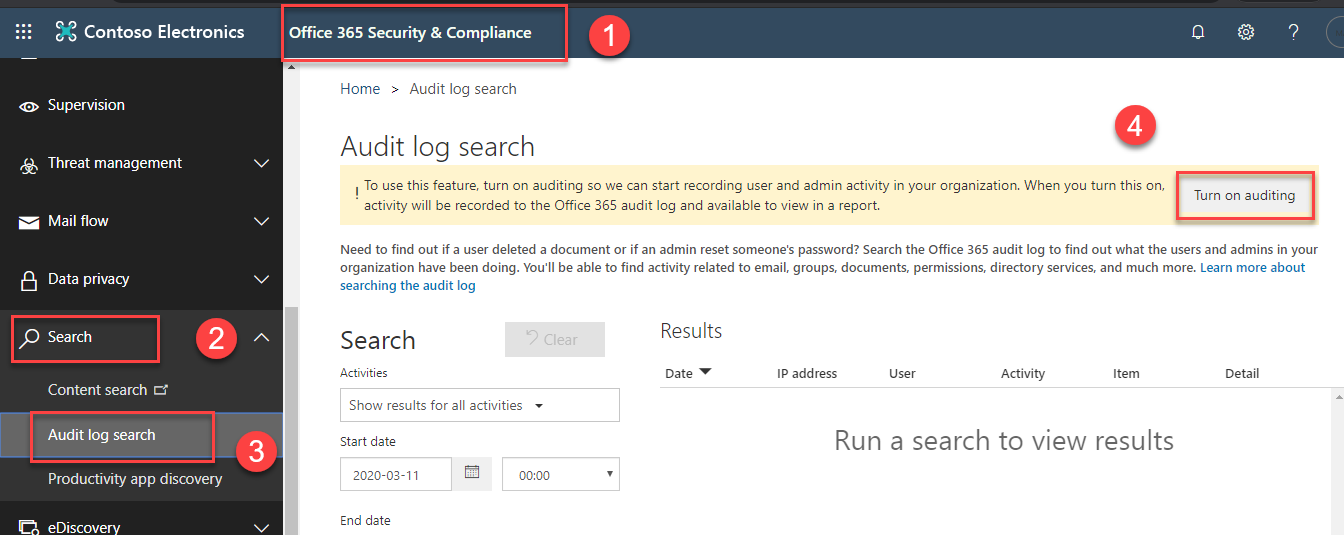
Enable audit log:
We need to turn on the audit log to show alerts and track remediation actions taken by the reviewer. To turn on the audit log, Go to Office 365 Security & Compliance center → Search → Audit Log search → Turn On auditing.
It takes a couple of hours to search for the user and group activity.
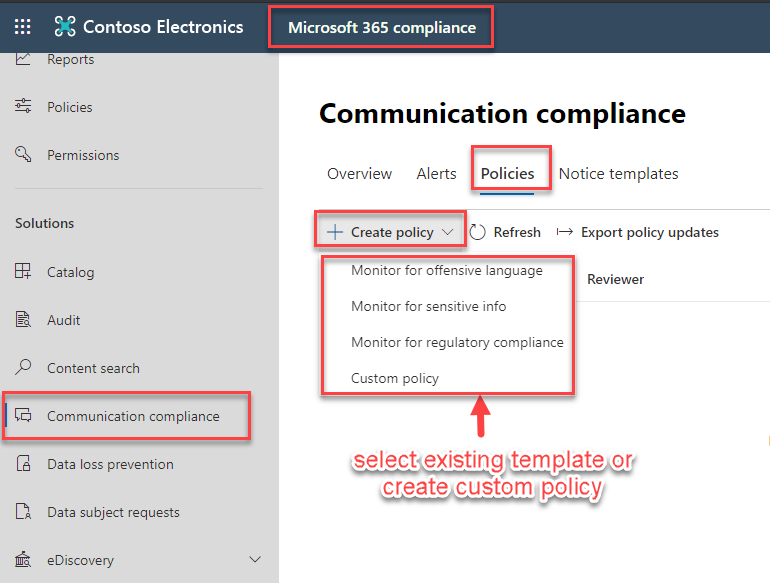
How to create communication compliance policy
We can create communication compliance policy from https://compliance.microsoft.com → Communication compliance → policies → Create Policy → select the existing template/custom policy.
It takes 24 hours to activate after creating the policy.
Note: When we select the template to monitor the communication, we can’t change the default settings which is available in templates, but after creating the policy you can edit the default setting by clicking the Edit option.When we select the template to monitor the communication, we can’t change the default settings which is available in templates, but after creating the policy you can edit the default setting by clicking the Edit option.
Communication compliance Templates:
Microsoft offers the template that is used to detect the communication risks which is shown below
- Monitor for offensive language and anti-harassment:
- Monitor for sensitive info
- Monitor for regulatory compliance
And one more is Microsoft also allow us to create Custom policy:
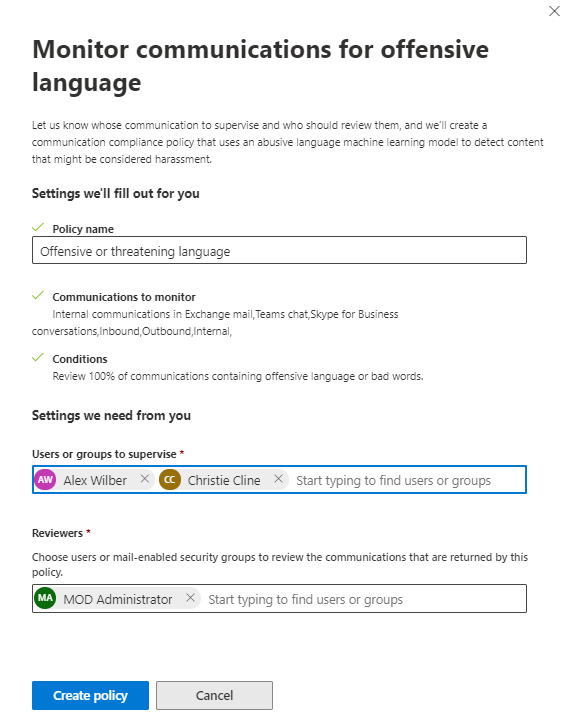
Monitor for offensive language and anti-harassment:
This template gives a built-in classifier that detects the abusive and offensive language. It has four settings, that is
- Communications to monitors
- Conditions
- Users or groups to supervise
- Reviewers
Communications to monitors:
This is a default setting, we cannot modify this setting and It will cover following communications Exchange mail, Teams chat and Skype for Business conversations.
Conditions:
This setting also default setting, we cannot modify this setting and it will review 100% communication containing offensive language or bad words.
Users or groups to supervise:
In this setting, we can select the users and groups whose communications we want to supervise.
Reviewers:
This setting allows us to choose the users or mail-enabled security groups to review the communications that are returned by this policy, by default it chooses the Admin account as a reviewer.
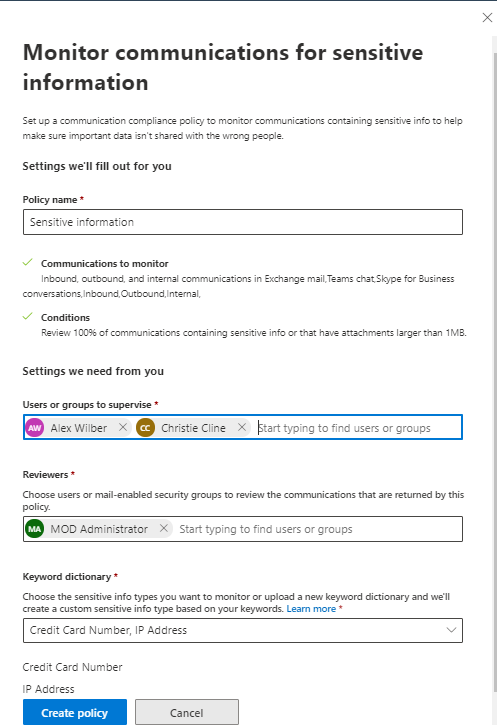
Monitor for sensitive info:
This template detects the sensitive information which is shared and received from another user. It has five settings, that is
- Communications to monitors
- Conditions
- Users or groups to supervise
- Reviewers
- Keyword dictionary
Communications to monitors:
This is a default setting, we cannot modify this setting and It will cover following communications Exchange mail, Teams chat and Skype for Business conversations.
Conditions:
This setting also default setting, we cannot modify this setting and it will review 100% communication containing offensive language or bad words.
Users or groups to supervise:
In this setting, we can select the users and groups whose communications we want to supervise.
Reviewers:
This setting allows us to choose the users or mail-enabled security groups to review the communications that are returned by this policy, by default it chooses the Admin account as a reviewer.
Keyword dictionary:
Here we can choose the sensitive info type which we want to monitor (ex. Credit Card Number, IP Address)
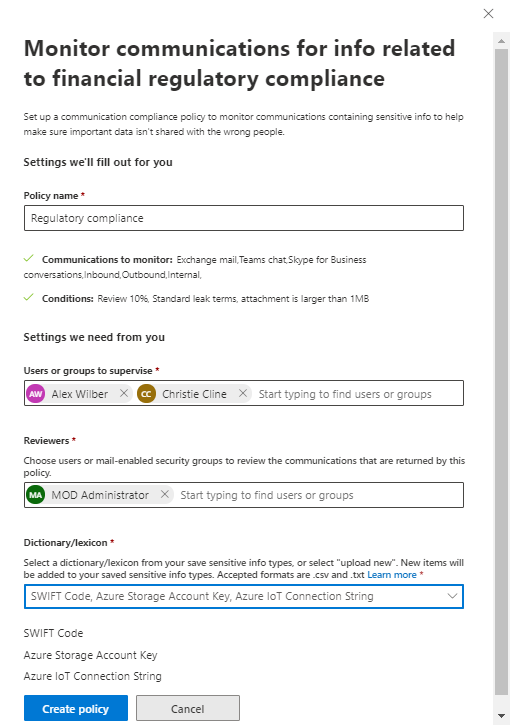
Monitor for regulatory compliance:
This template detects the standard financial terms associated with regulatory standards in communication. It has five settings, that is
- Communications to monitors
- Conditions
- Users or groups to supervise
- Reviewers
- Keyword dictionary
Communications to monitors:
This is a default setting, we cannot modify this setting and It will cover following communications Exchange mail, Teams chat and Skype for Business conversations.
Conditions:
This setting is also default setting, we cannot modify this setting and it will review 100% communication containing offensive language.
Users or groups to supervise:
In this setting, we can select the users and groups whose communications we want to supervise.
Reviewers:
This setting allows us to choose the users or mail-enabled security groups to review the communications that are returned by this policy, by default it chooses the Admin account as a reviewer.
Dictionary/lexicon:
Using this setting, we can choose the information like (SWIFT code, Azure Storage Account key, Azure IoT Connection string) to review from.
Custom policy:
Using the custom policy, we can create the policy with our own rules to monitor specific communication channels, apply a specific condition, customize the amount of content review for supervision.
How to create a custom policy
We need to follow the below steps to create the custom policy
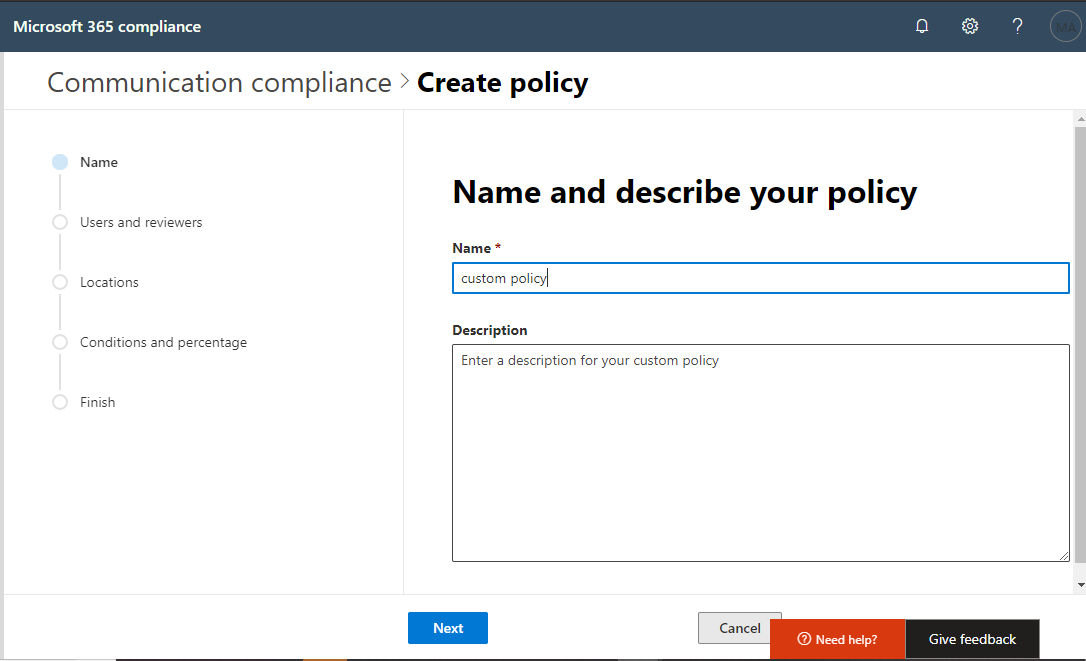
Step1:
Enter the name of the policy and description
Step2:
In this step, you can select the users and groups whose communications you want to supervise.
To choose supervised users and reviewers it offers two option which is
- All users
- Select users
We can select all users and exclude any of the users or groups in the list or we can select specific users or groups to supervise.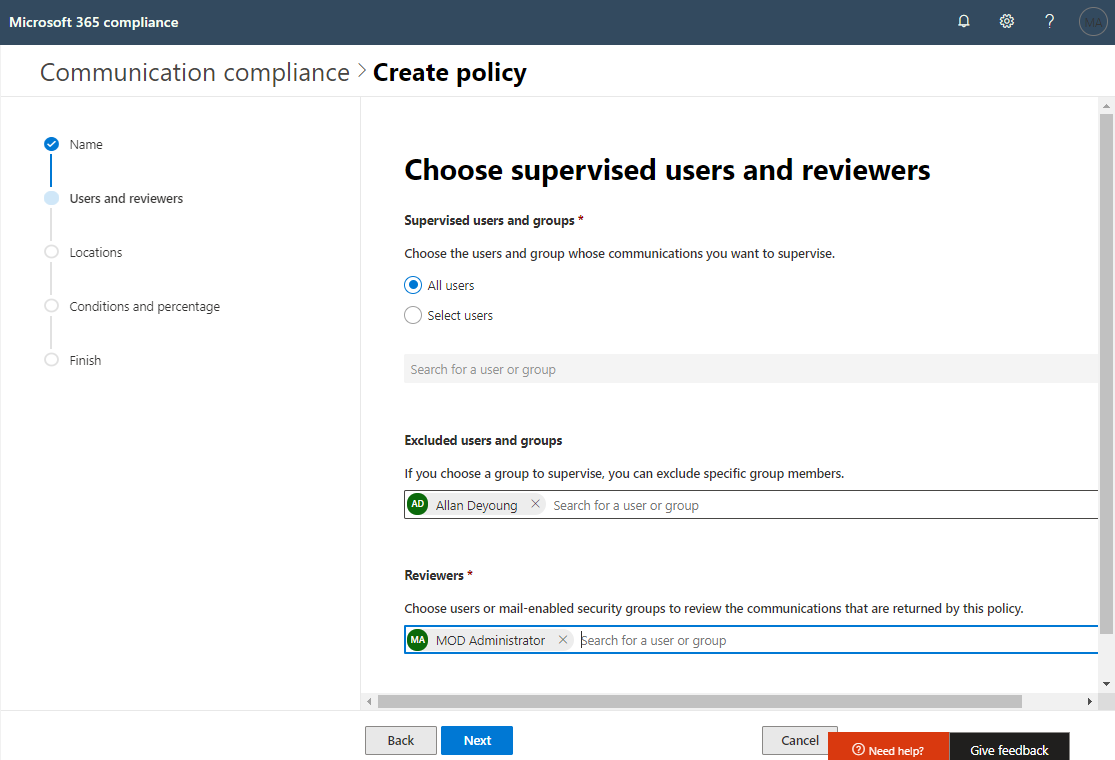
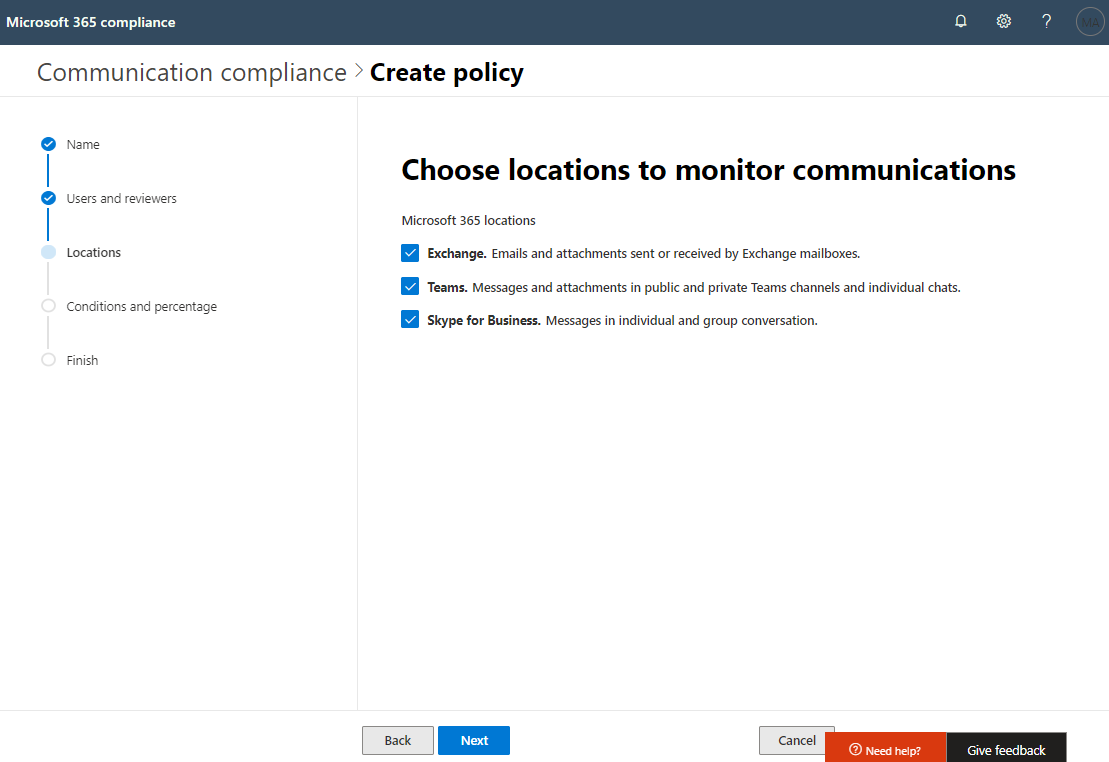
Step 3:
In this step, we can select which location we want to monitor the communication.
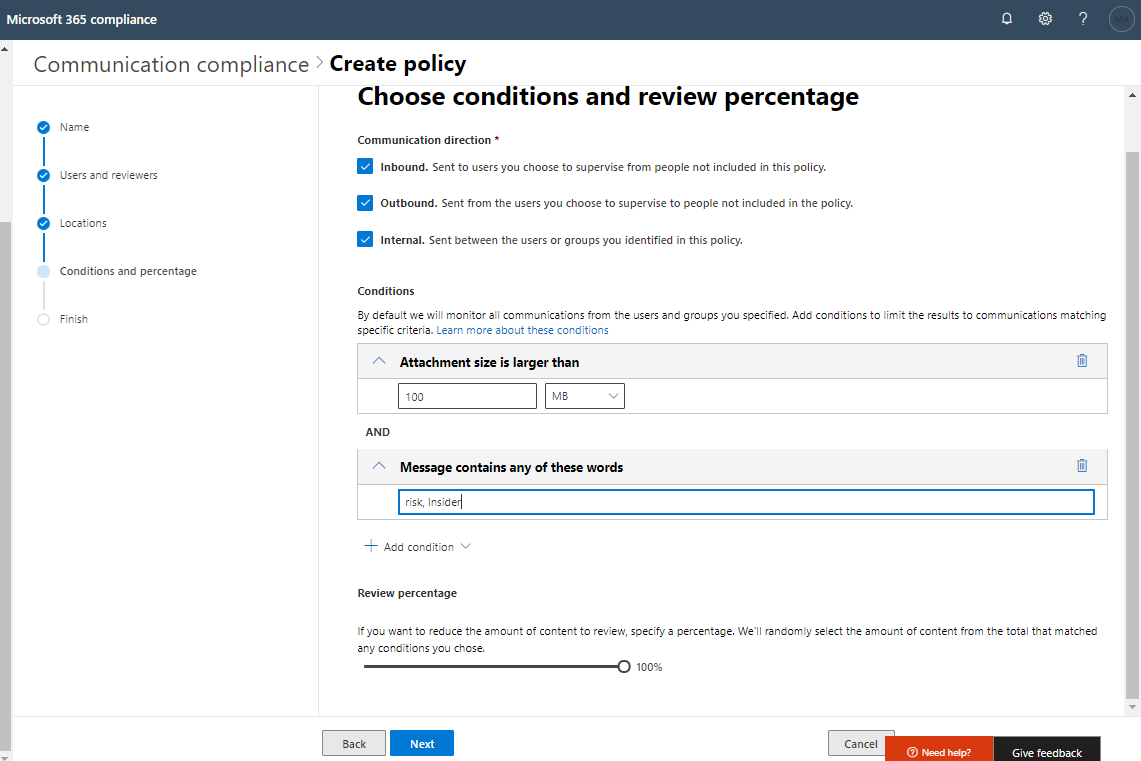
Step4:
In this step, we can add the communication direction and condition to filter the specific content to review.
Communication direction:
It allows to select the direction to monitor communication, the directions are
- Inbound
- Outbound
- Internal
Condition:
By default, it monitors all communication data’s in the users and groups which we mentioned before.
we can also add a condition such as Attachment size is larger than, Message contains any of these words, Message is received from any of these domains, etc…,
Review Percentage:
This review percentage is used for the amount of content to review through percentage If you want to reduce the amount of content to review then drop down a percentage.
And finally, review the policy and Create policy.
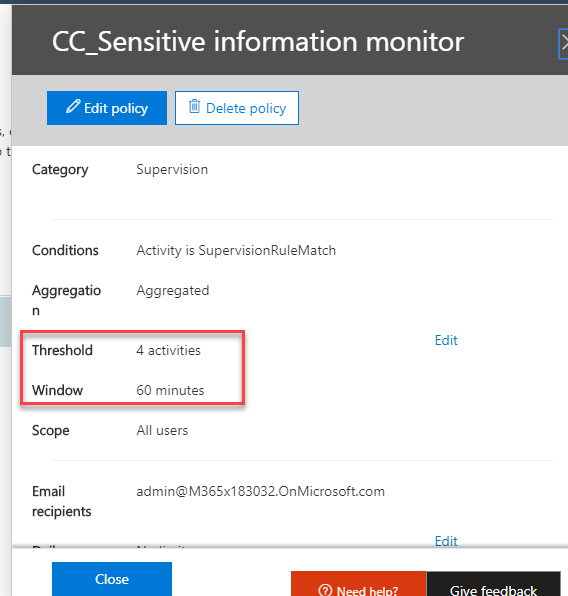
After creating the above policy, it creates alerts policy compatibly inside Alerts in office 365 security and compliance centre, and you can change the threshold, by default it considers 4 activities within 60 minutes.