Microsoft is merging the powerful capabilities of Stream and SharePoint to bring you native video experiences integrated across Microsoft 365. The emergent – “Stream (on SharePoint)” is an intelligent enterprise video experience that is part of Microsoft 365. It empowers you to record, upload, discover, share, and manage video just as you would any other file.
Sooner, Microsoft is planning to retire the classic Stream once the emergent is ready to release. And hence to help the users in the transition, they built a migration tool to allow users to move videos from Stream (Classic) directly into SharePoint and OneDrive to take advantage of Stream (on SharePoint).
Retirement of Classic Stream
Early Q1 CY2023 – The announcement of the retirement date of Stream (Classic) is expected when the migration tool graduates from public preview to general availability. From the announcement of the retirement date,
- Within three months, No new videos can be uploaded to Stream (Classic), with the option to delay this requirement an extra three months.
- Within eight months, Stream (Classic) will be automatically disabled for users, with the option to delay this disablement an extra four month.
- Within one year – users have to migrate their content before Stream (Classic) is retired.
Key points to consider before Migration
✓ Microsoft won’t automatically force a migration. If you choose not to migrate your content, it will be deleted when Stream (Classic) is retired.
✓ Not all content in your tenant needs to move to Stream (on SharePoint). Before you migrate, with the help of Stream (Classic) inventory & usage report, you can audit your video files, and remove or leave behind any stale content.
✓ Only a SharePoint or Global Admin can use the migration tool and only a Stream (Classic) or global admin can access the Stream (Classic) migration settings.
✓ Only certain attributes of critical metadata and permissions will be migrated with the videos (title, description, transcripts, etc.) The remaining metadata won’t be migrated. For complete details, refer to Metadata that migrates with videos.
Container classification
The Migration Manager organises the classic content as containers which is basically a group of videos.
Currently the containers in Stream (Classic) are classified into five types:
| Container Name | Container Type | Classic Content Mapping |
|---|---|---|
| Microsoft 365 Group | M365Group | Videos in Microsoft 365 Groups and channels inside them |
| User | NA | Videos in ‘My Content’ in Stream (Classic). Each user who has published at least a video and not associated that video with a group or channel will display as one container in the tool. (Recorded Teams meeting recording count as published videos) |
| Stream Group | StreamOnlyGroup | Videos in Stream only groups. These containers only show up for customers that migrated from Office 365 Video to Stream (Classic). |
| Companywide Channel | CompanywideChannel | Videos in companywide channel |
| Orphaned [Not available in Preview] | NA | Video with no owner. Videos of uploader who left the organization combined into one or multiple containers |
How to pull the Stream (Classic) inventory report
Note: Stream admin role is a prerequisite to run the report.
Large tenants might have to save the token more than once, as the token expires after an hour.
You can use the inventory report provided by the tool to plan on your migration. Let us see how to pull that report.
Step 1 : Download the script
Logon to the Stream Admin Center, Navigate to Stream migration (Preview) -> Reports (Preview) -> Download script.
Step 2 : Save the token
- Open browser, press F12 and navigate to Stream Portal
- Select the Network tab and filter by ‘refreshtoken’. Select the Request with Method – GET
- Look for Authorization in Request headers and copy the value after ‘Bearer’
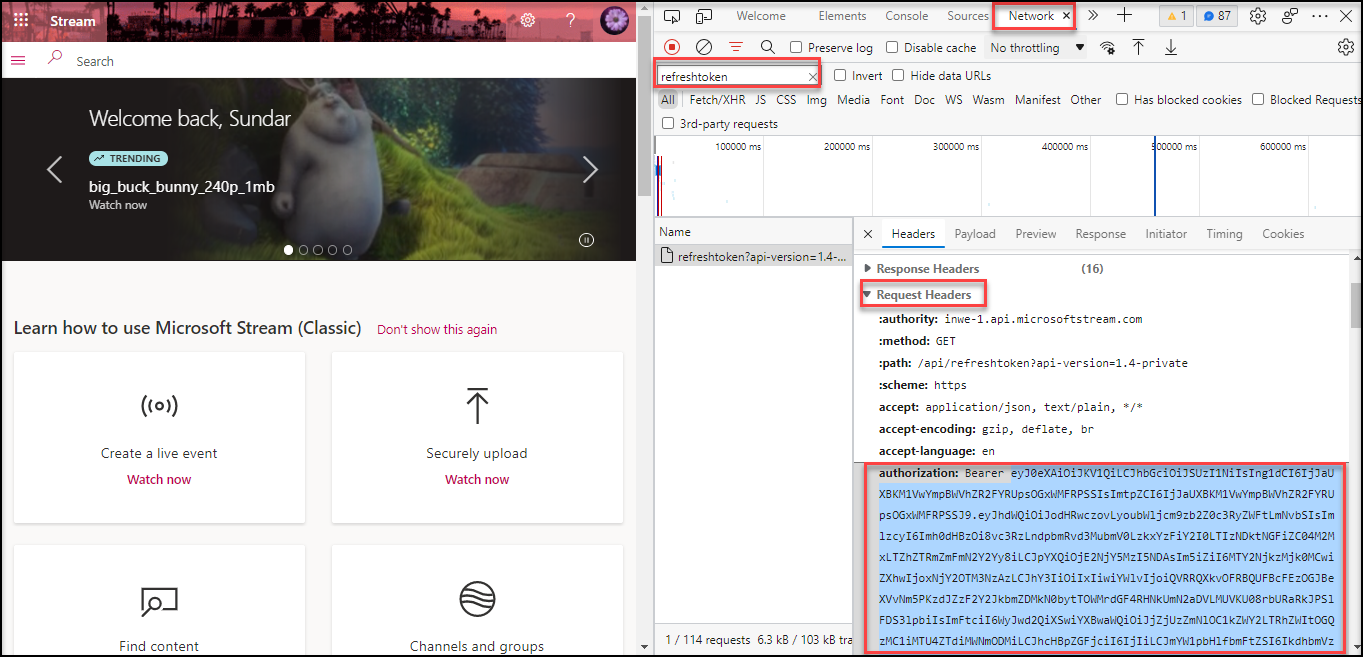
- Save the token to a file.
E.g : D:tokenFiletoken.txt
Step 3 : Execute the script
Open PowerShell and execute the below command from the directory where the script is saved.
.StreamClassicVideoReportGenerator.ps1 -AadTenantId -InputFile -OutDir -ResumeLastRun
Sample Command
.StreamClassicVideoReportGenerator.ps1 -AadTenantId “91c1bcb4-2349-4abd-83c1-6ae4ffaf7f6c” -InputFile “D:tokenFiletoken.txt” -OutDir “D:usageReport” -ResumeLastRun false
Inputs detailed out
| Input | Mandatory / Optional | Explanation |
|---|---|---|
| AadTenantId | Mandatory | AAD Tenant ID of the tenant |
| InputFile | Mandatory | Absolute Path of the token file |
| OutDir | Mandatory | Absolute Path where the report to be stored |
| ResumeLastRun | Optional | Default = true; to decide if the report to be resumed from the previous run. |
| PublishedDateLe | Optional | Fetches videos whose Published Date is less than the input value. E.g : “2022-08-01” |
| PublishedDateGe | Optional | Fetches videos whose Published Date is greater than the input value. E.g : “2009-12-31” |
The report contains the following information for each video
- Video Identifier: Also found at the end of URL when you play a Stream (classic) video
- Name of the video
- State of Video: Refer to the following definition
- Created = Record created but upload hasn’t started
- Uploading = Video is being uploaded
- Processing = Upload successful but currently being processed
- Completed = Processing was completed
- Deleted = Soft Deleted (will be available in recycle bin)
- Error = Error during upload or processing
- Live = Live broadcast is in progress
- Description of Video
- Published date
- Last view date: Date when video was last viewed. This date has been captured since around July 2021. Any video uploaded and viewed prior to July 2021 would have this field as empty, even though it was viewed.
- Size: In bytes
- Number of View
- Number of Likes
- Content Type: can take the following values
- Generic
- Meeting
- Live Event
- Privacy Mode: Can take the following values
- Organization: visible to everyone in the organization
- Private: visible to a selected few individual
- Creator: The original uploader of the video
- Owners: Can be multiple, individual or groups
- Container (ID, Name, Type, Email): They’ll be useful if you want to map videos to containers as the tool displays the data at container level. These values can be empty if the video is an orphan video and doesn’t belong to any container. Container email will also be empty for Stream groups.
Videos eligible for migration
For a video to be eligible for migration, it has to satisfy the criteria below. Only such eligible videos will be discovered via the Migration Tool.
- Videos with state – Processing or Completed
- Videos that are Published
- Videos with non-empty container id
Videos ineligible for migration
Videos that are ineligible for migration are:
- Videos that haven’t been published
- Videos that are in some sort of processing or upload error state and thus aren’t able to be played
- Videos that are “orphaned,” meaning there are no longer any owners in the organization for the video, the people who uploaded it owned it have left the organization
- Videos that are “soft deleted,” meaning they’ve been deleted by the user but are still in the recycle bin
The output CSVs generated looks as below
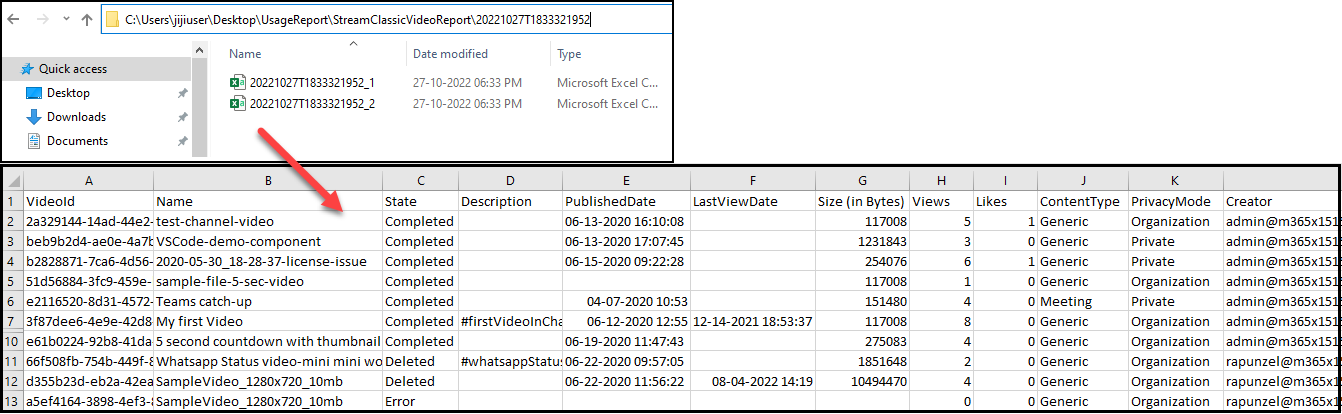
Notes:
- Don’t open the generated files when the script is running.
- The generated files may have duplicate entries for a video.
- A file will be limited to have 1000 entries.
Step 4 : Convert to Power BI analysis report
To better analyse the output from the inventory report Microsoft has provided a sample Power BI Desktop template that ingests the csv files generated in the previous step. Follow the below steps to generate the analysis report using this template.
- Download & Setup Power BI Desktop – Link here.
- Download the Sample Power BI template from this link.
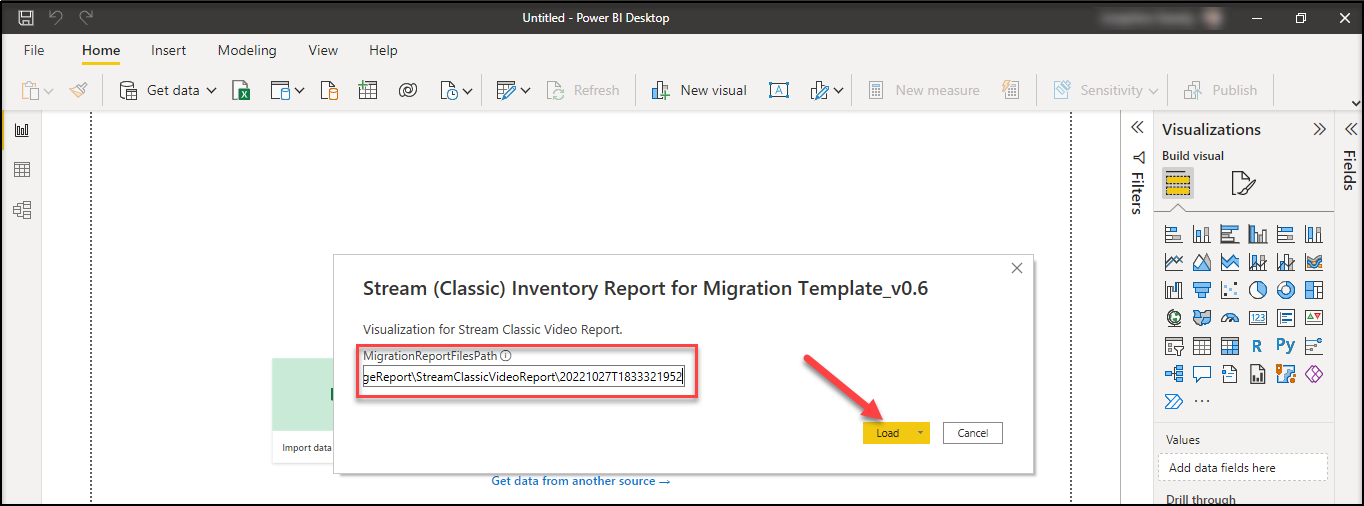
- Open the .pbit file downloaded in the previous step with Power BI Desktop.
- Key-in the path to the CSV files (Output of the script)
E.g : D:StreamClassicVideoReport20221027T1833321952 - Click Load
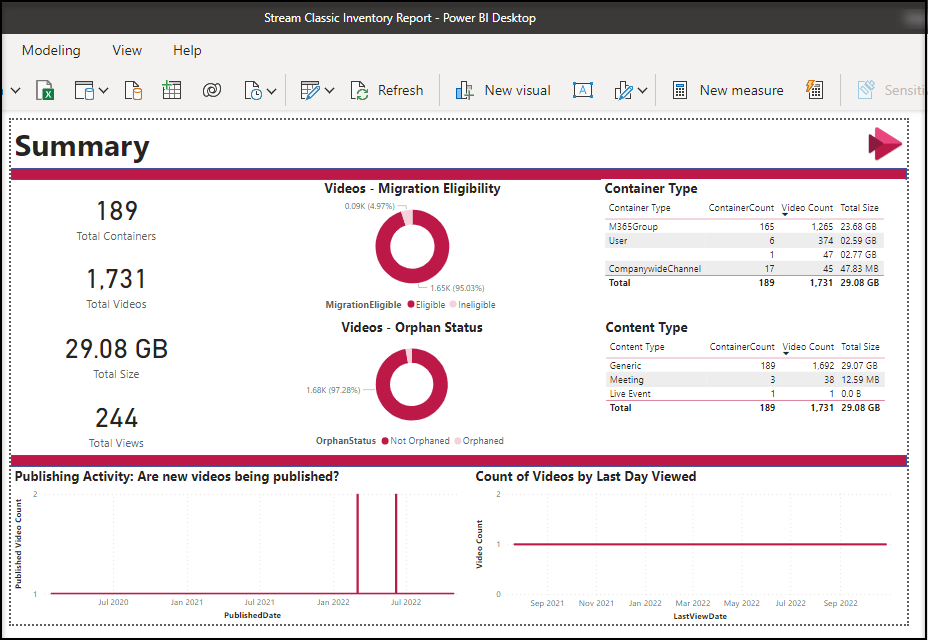
This is how the Power BI report – Overall Summary looks like
Hands into Migration
Important: Only a SharePoint or Global admin can access the migration tool.
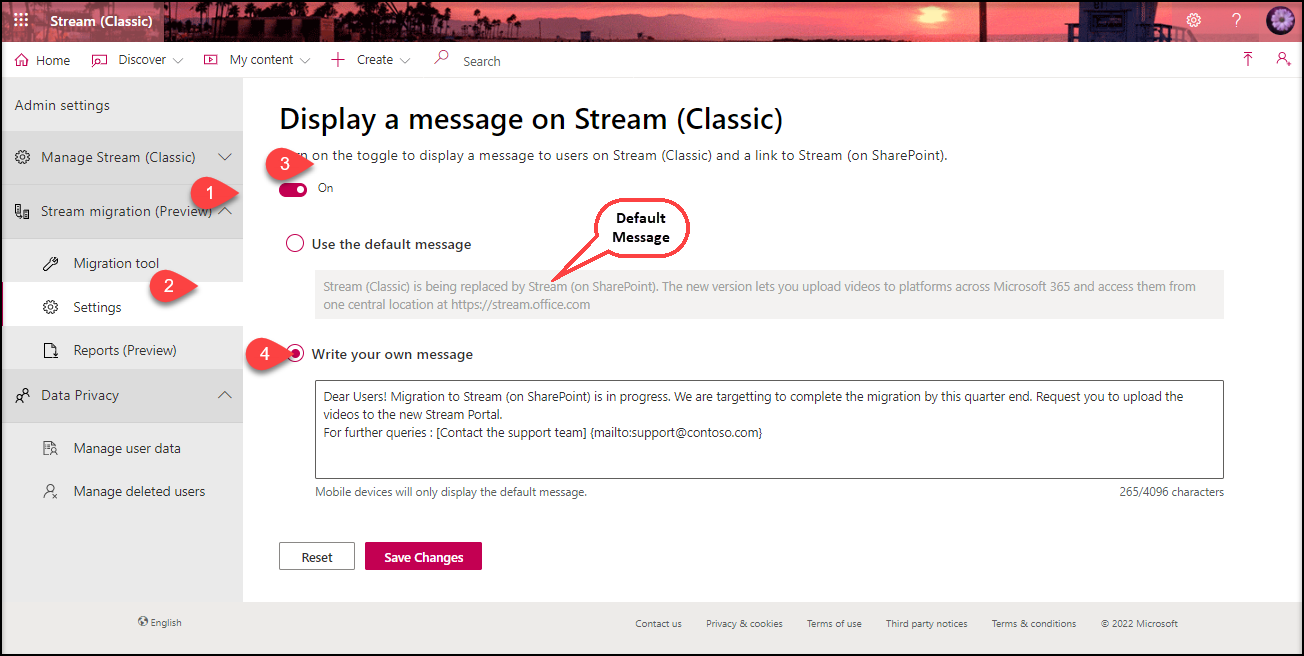
Set the migration display message
You can display a customised or default message to your Stream (Classic) users.
To achieve this, Logon to the Stream Admin Center, and navigate to Stream migration (Preview) -> Settings.
The default message has a link routing the users to the Stream (on SharePoint), you can very well add a customised message here.
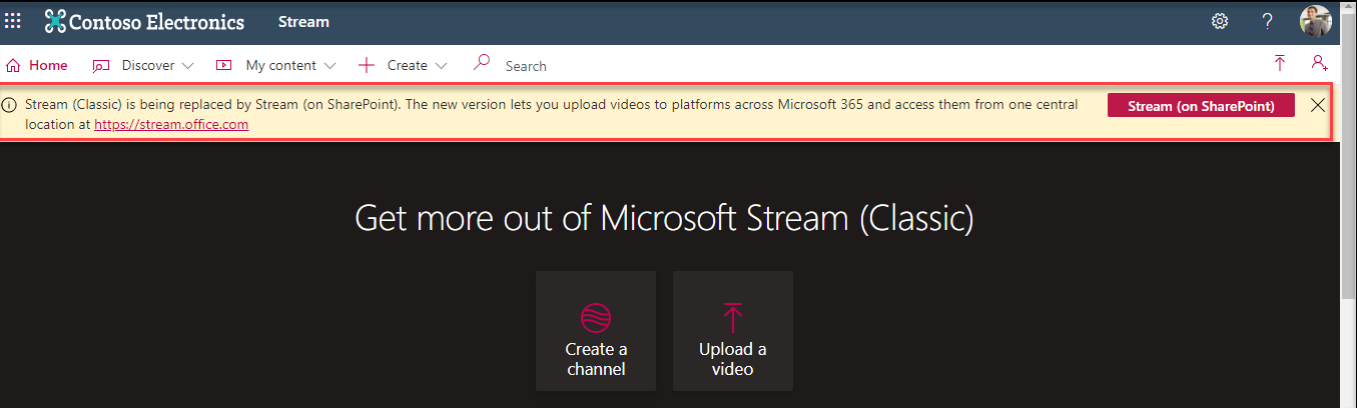
This is how the users perceive it
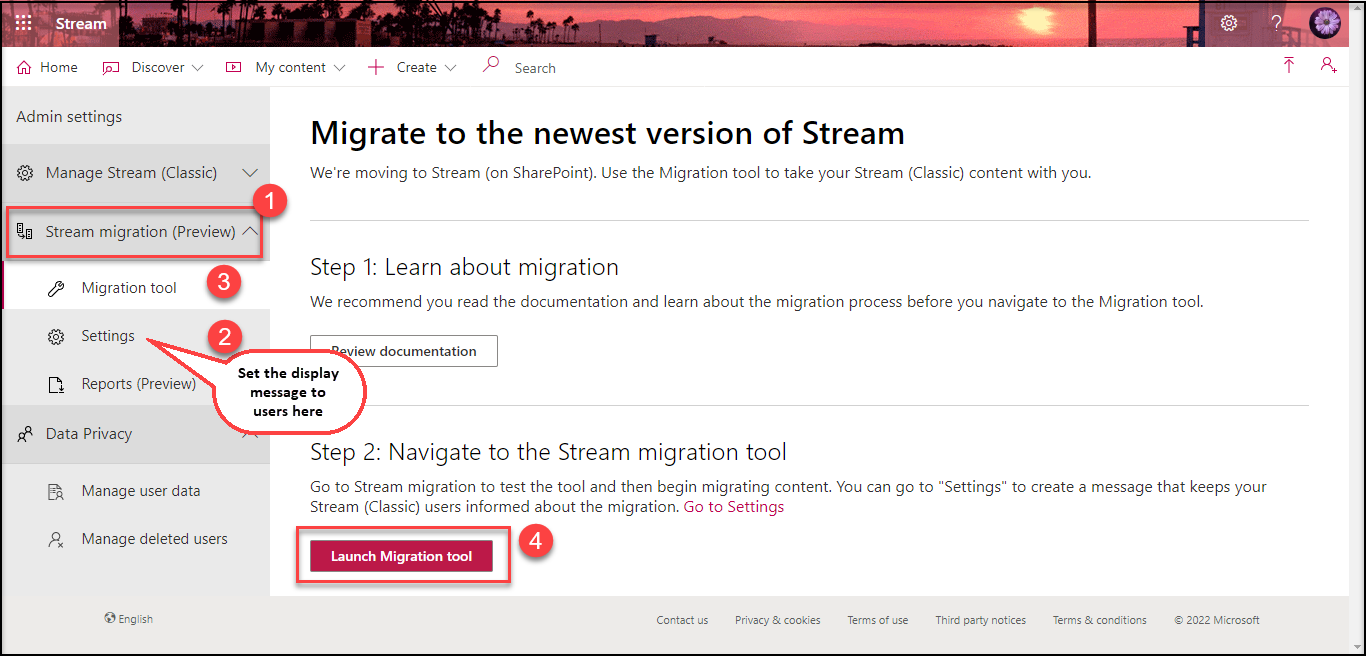
Step 1 : Launch the Migration tool
Logon to the Stream Admin Center, Navigate to Stream migration (Preview) -> Migration Tool. Click ‘Launch Migration Tool’.
Note : You can also access the Migration tool via Stream connector inside Migration manager from the SharePoint Admin Center. Whatever the trigger may be, the tool is launched from the SharePoint admin center.
Key attributes of the Landing Page

Connection Status : If there is a green dot on top right corner of the screen, it indicates that Stream is successfully connected. If it is not green, it indicates that the tool will not work. You have to add the following URLs to allowlist : https://api.mover.io and https://api.microsoftstream.com/- Add Containers : We have different choices to get the newly added containers from the Source Tenant post the initial scan.
🠊 Look for new containers in Stream : Look for any new containers added after the last scan.
🠊 Specify single container : Add a single container path to discover it manually
Format : containerId|containerType
Sample : 3bcd79ce-1980-4cb0-8ad6-e1d5859f7885|M365Group
For container types, refer to the section Container classification -> Container Type
🠊 Upload a CSV file : Add multiple container paths in a CSV to discover them manually. The paths to be uploaded are similar to the ones in the previous option.
Sample CSV
- Download reports : This envisions users with the detailed report on the
🠊 Scan Summary : Gives a summary of the scanned containers including container name, size, scanned videos inside it, unique permissions on the videos, number of videos, and total data size.
🠊 Scan Errors : List the containers that failed during the scan along with the Failure Reasons.
🠊 File Extensions : Size of the videos in the scanned containers extension-wise - Overview Summary Table : Showcase a summary of the scanned containers, scanned videos and the total data size. To hide this table, click in ‘Hide table summary’ option highlighted in the above picture.
- The actual data : Tabulates the containers and their details including the container names, types, their paths and the details on scan.
Step 2 : Prepare for Migration : Action on containers
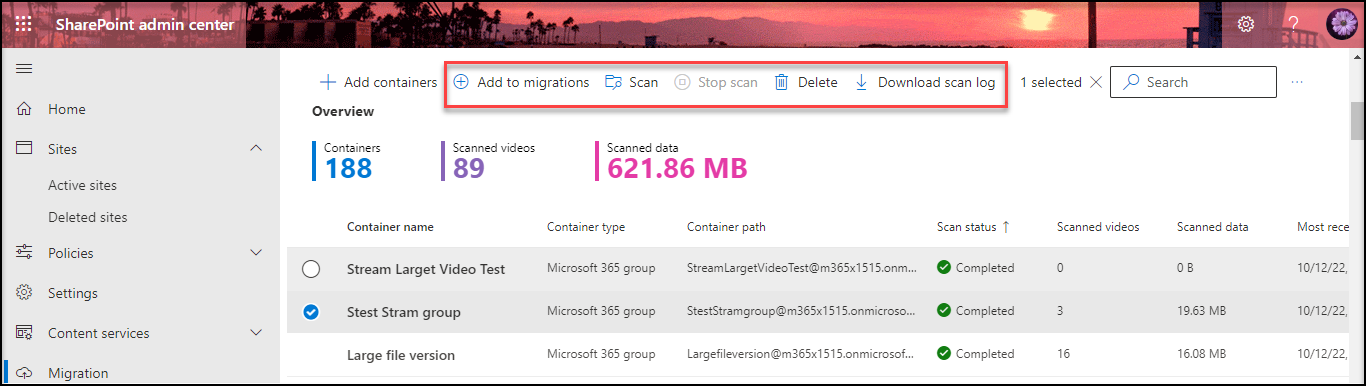
- Scan : To scan videos inside a container, you need to scan it. Select the containers and choose Scan Container. As a container is scanned for videos, its status changes from queued, in-progress, finalizing, to complete.
- Stop scan : We can stop the scan once it is initiated, but it leads to error-prone results. So, stop the scan only if it completely necessary.
- Add to migrations : Once the status of a container is complete, you can add it to the Migrations tab to prepare for the migration process.
- Download scan log : The Scans log is a container-level report that includes details about each scanned video, including—its size, name, source path, and total & unique permissions/ACLs on it.
- Delete : You can delete the previously scanned & migrated containers, post which you can discover and scan the remaining containers.
Step 3 : Perform Migration
Once you add the containers to the Migrations tab, you can proceed with their migration.
Attributes of the Migrations Tab
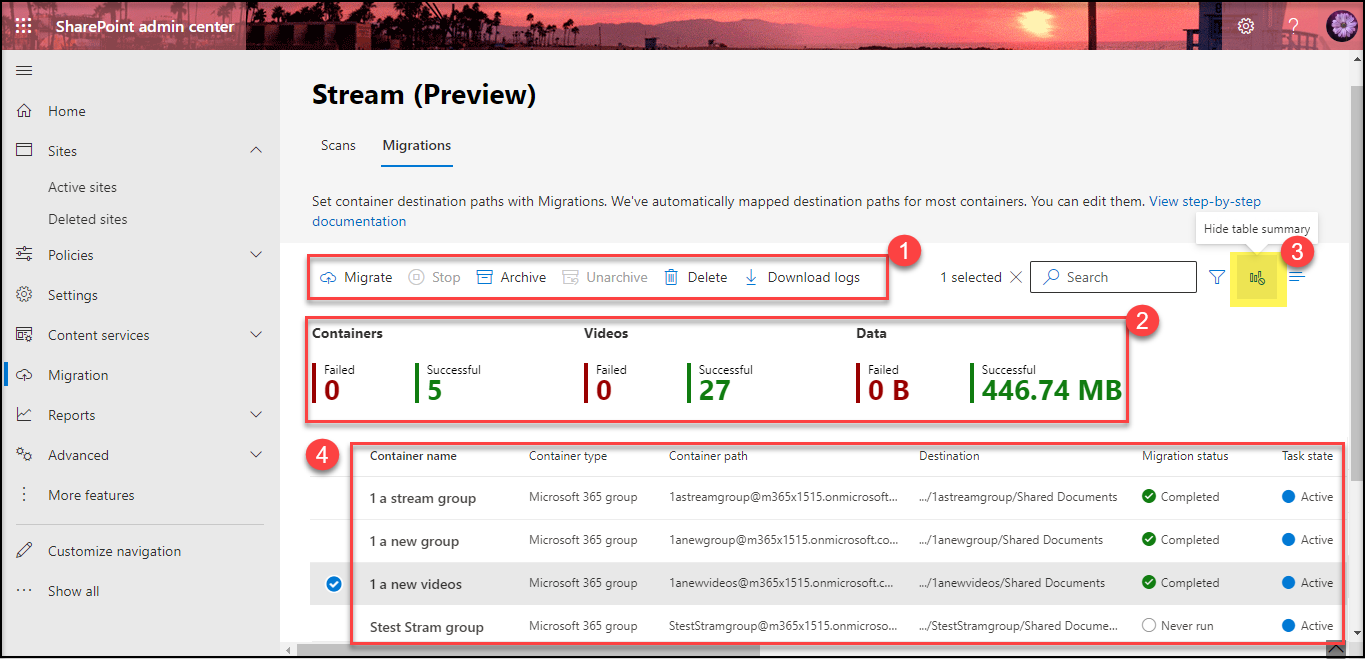
- Action at container-level
🠊 Migrate : Choose containers and perform actual migration.
🠊 Stop : Cancels any ongoing migration.
🠊 Archive : You can archive any container, which will still appear in the container list but will not migrate when it is been selected. The ‘Task state’ column specifies if a container is archived.
🠊 Unarchive : By unarchiving you make the container to be migration-eligible once again.
🠊 Delete : Removes the container from the Migrations tab. You can still find it in the Scans tab.
🠊 Download logs : The Migration logs gives container-wise details on the video files and folders migrated.
Summary Table : Overall failed / successful count Container-wise, Video-wise and Data-wise.
Hide Table Summary : You can choose to hide the table summary by choosing the highlighted option.
The actual data listing the containers to be migrated / migrated with details including the count, size of the videos skipped, failed, or successfully migrated.
Assign with destinations
- The tool assigns the default destination for the containers Microsoft 365 Group and for User Videos. You can very well update to a new one if you wish to.
- For the other container types, you have to manually assign a destination. The recommended defaults are shown in the below table.
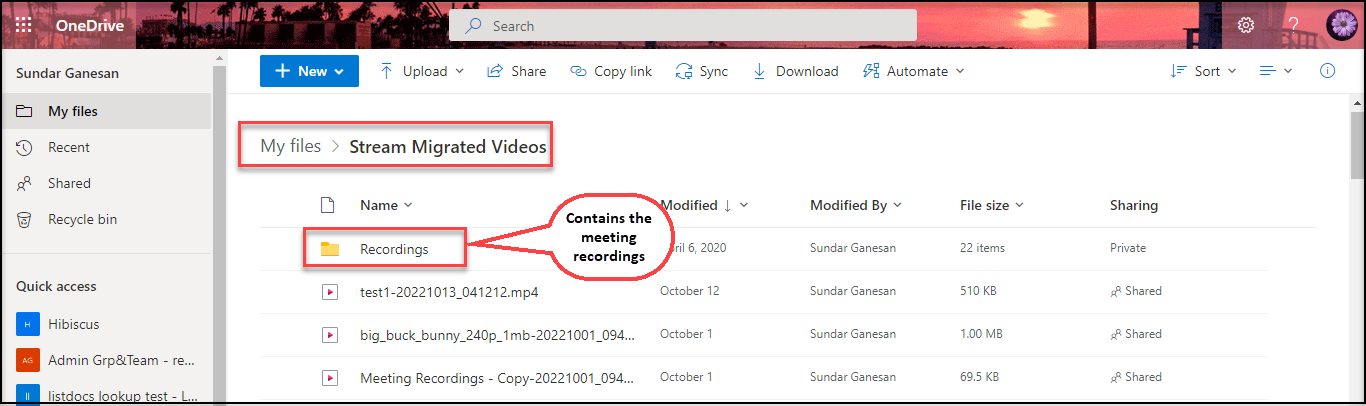
- A folder ‘Stream migrated videos’ will be created in the root document library. For a Stream / Microsoft 365 Group, each channel in the group will become a folder under ‘Stream migrated videos’ folder. Teams meeting recordings would be further under the ‘Recordings’ folder.
| Container Types | Default Destination |
|---|---|
| Microsoft 365 Group | Existing Microsoft 365 Group SharePoint team site |
| User Videos | A user’s OneDrive for Business (ODB) |
| Stream-only group | None (Users can choose between a SharePoint site or a user’s OneDrive for Business folder) |
| Companywide-wide channel | None (Users can choose between a SharePoint site or a user’s OneDrive for Business folder) |
| Orphaned [Not available in preview] | None (Users can choose between a SharePoint site or a user’s OneDrive for Business folder) |
Note : Though orphaned videos are not available in preview, the details could be found in the inventory report. Please refer section on – How to pull the Stream (Classic) inventory report.
Bulk update of destinations
You can choose to update the destinations of the containers as a batch, by choosing the option ‘Upload destinations’. A sample CSV could also be downloaded here.
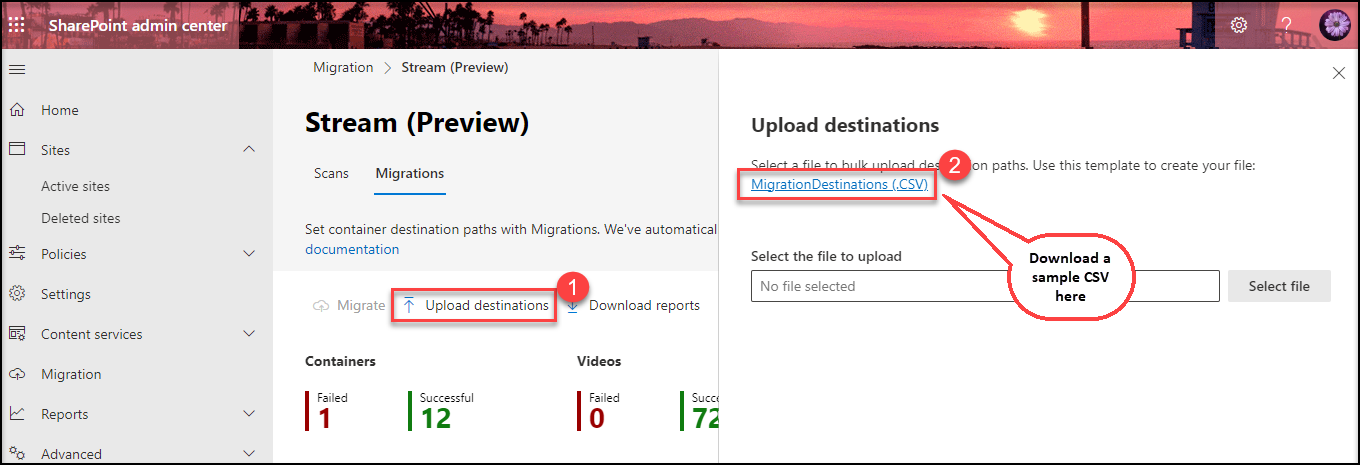
Sample CSV

Use cases
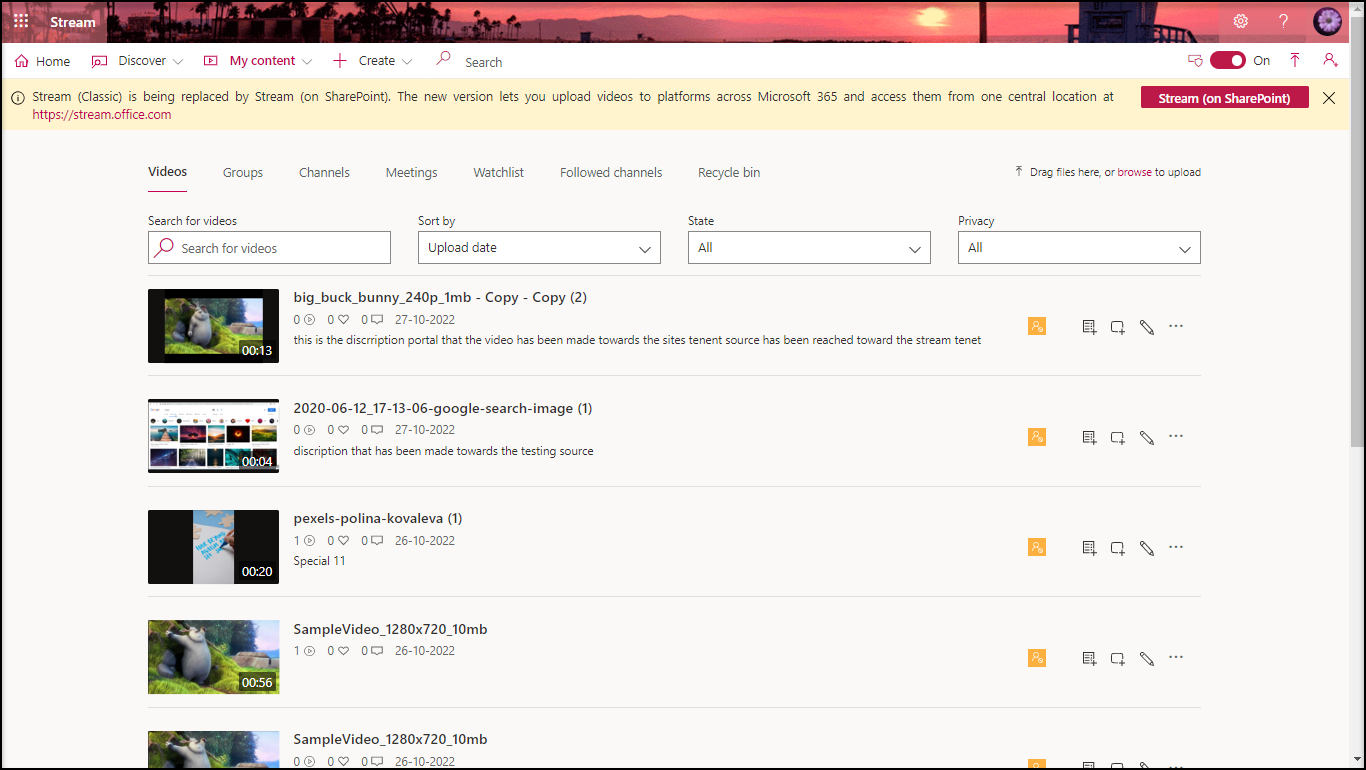
Use case 1 : Migration of User Videos
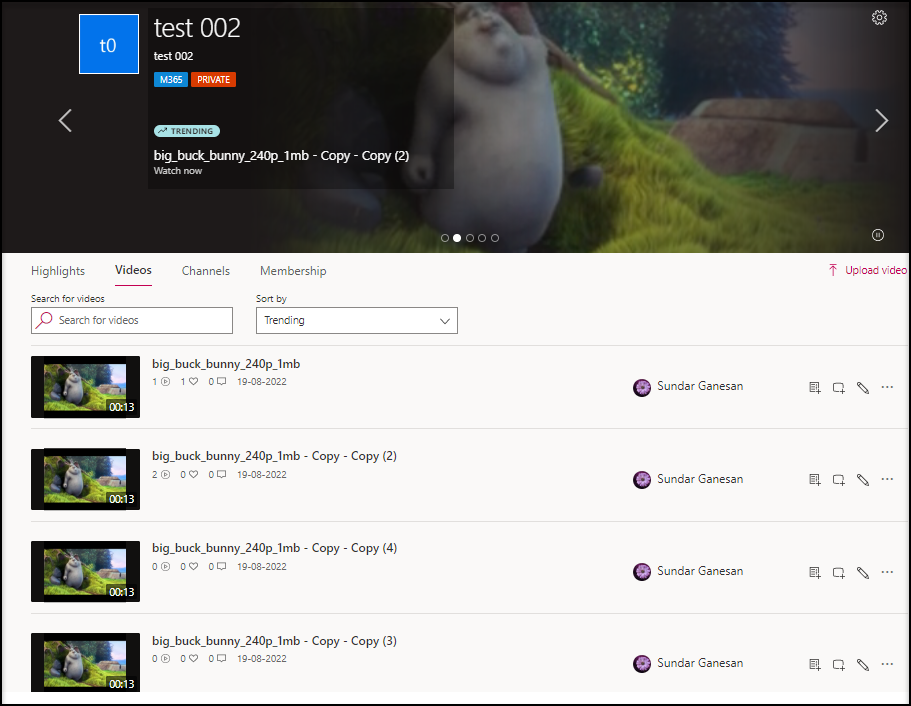
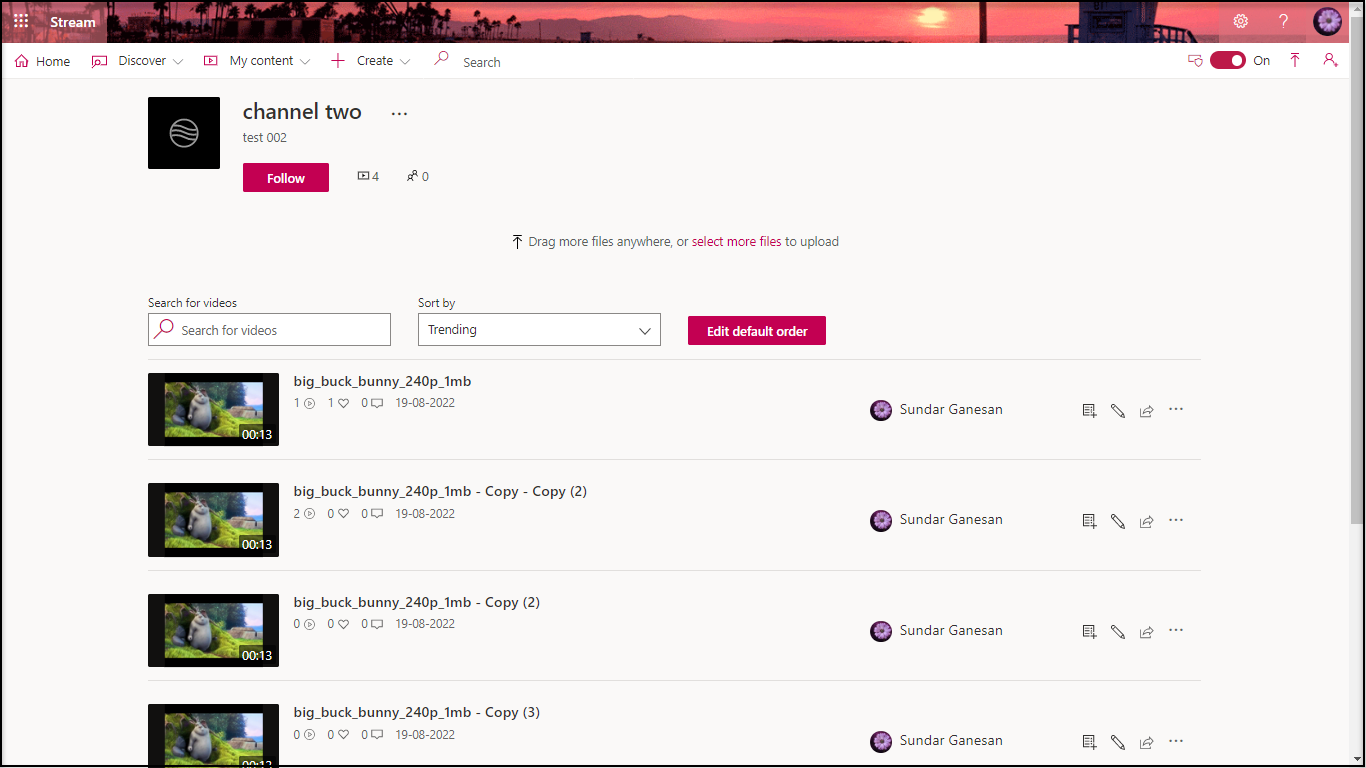
Source Stream Portal
In Migration Tool
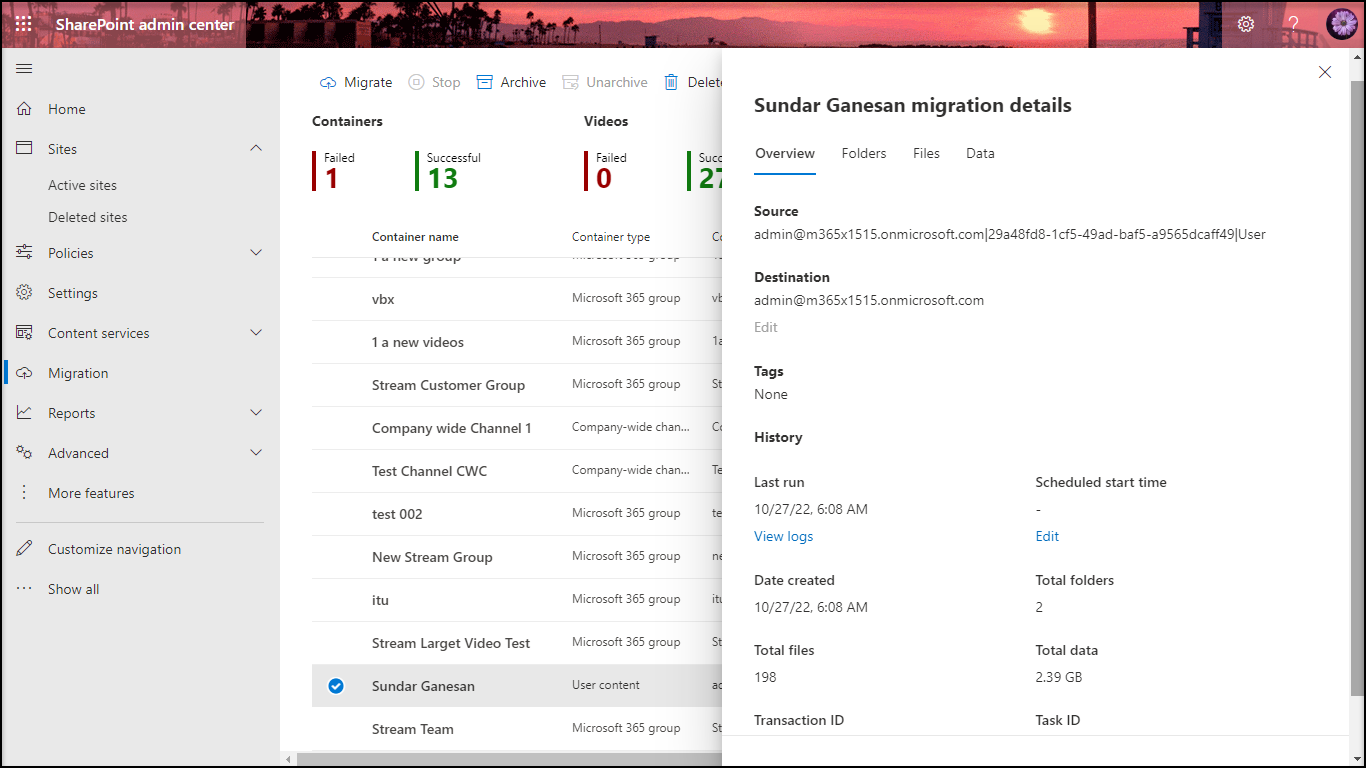
Migrated Content
The content is migrated to the user’s OneDrive
Use case 2 : Migration of a “Microsoft 365 Group”
Source Stream Portal

In Migration Tool
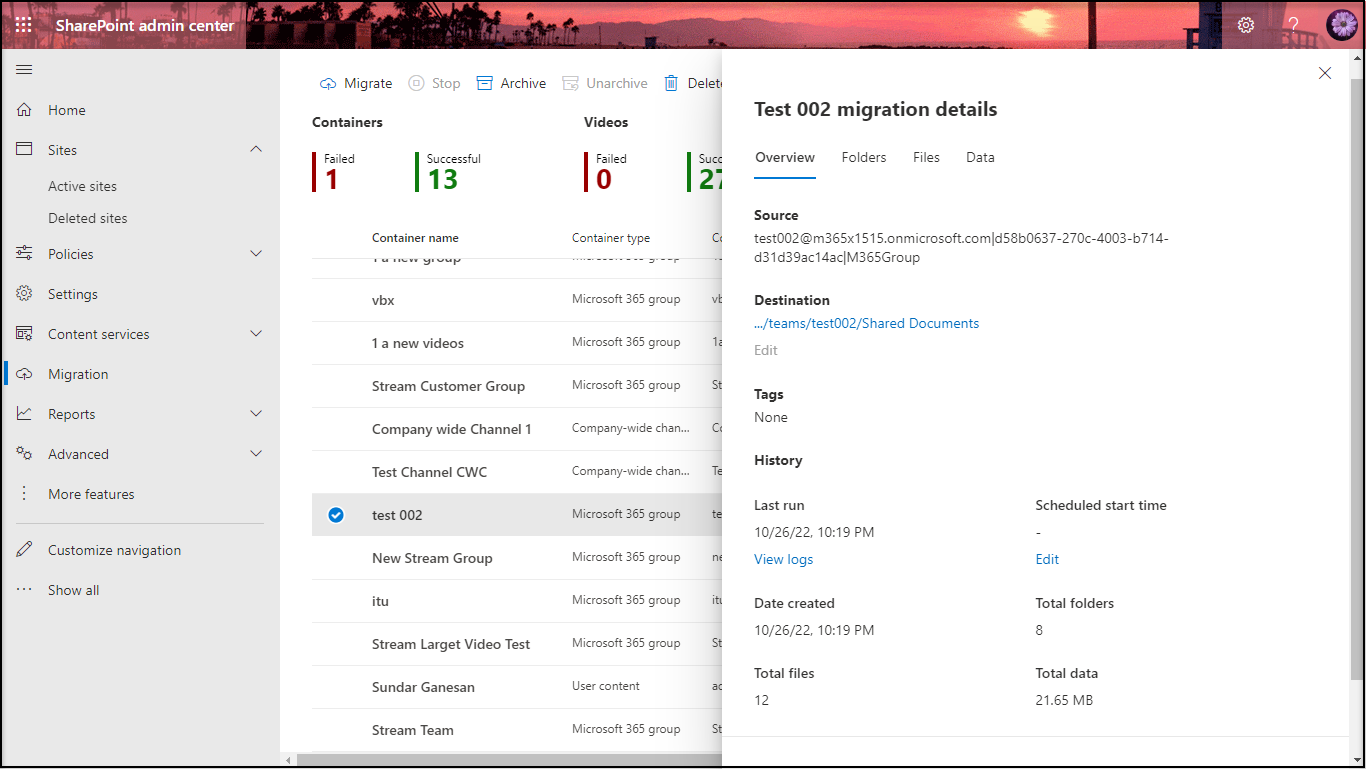
Migrated Content
The content is migrated to the SharePoint Site associated to the M365 Group.
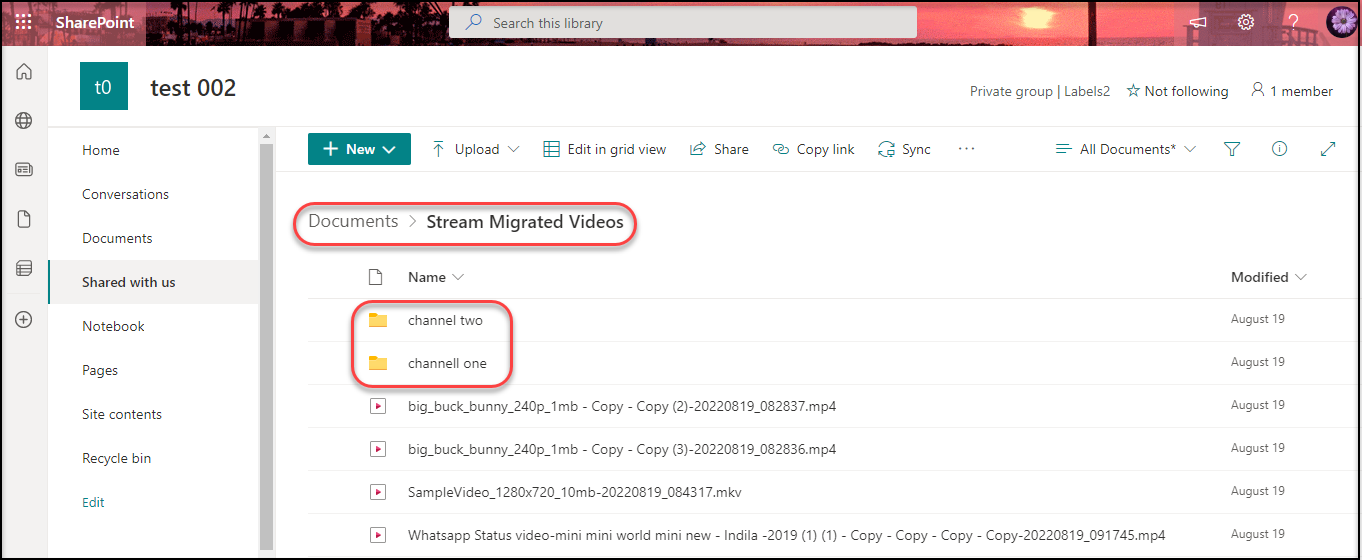
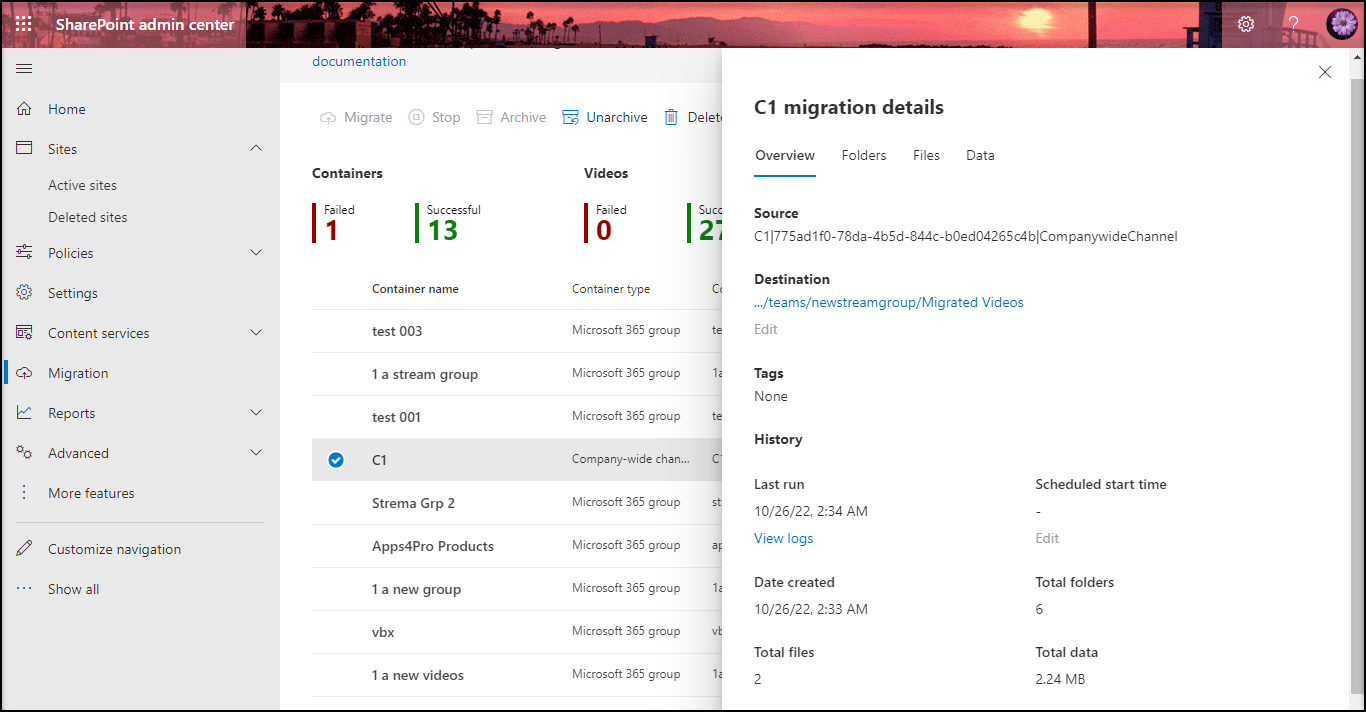
Use case 3 : Migration of Companywide Channel
Source Stream Portal
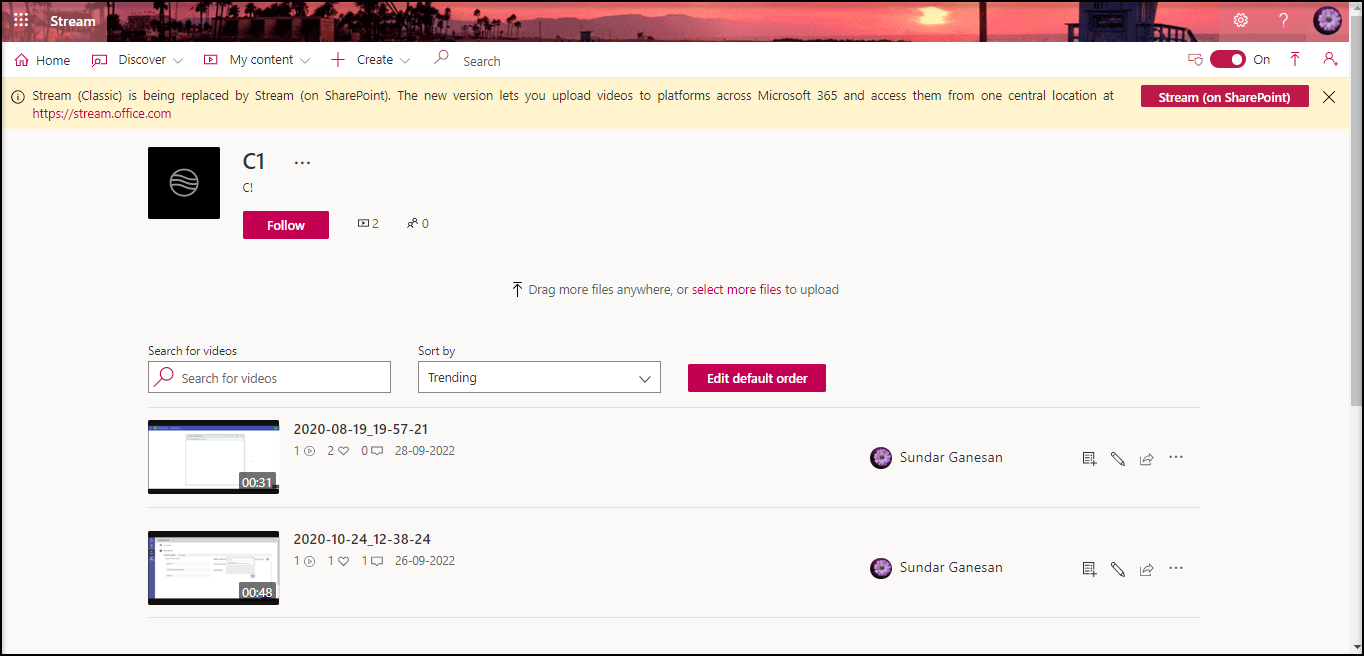
In Migration Tool
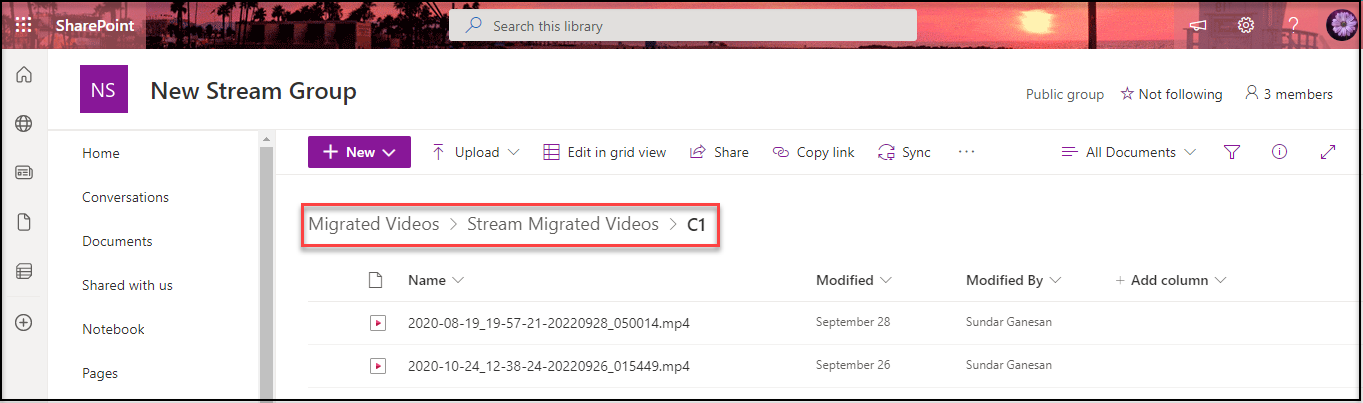
Migrated Content
The content is migrated to the chosen SharePoint Site.
Reference :
Step-by-step guide : https://learn.microsoft.com/en-us/stream/streamnew/step-by-step-guide
How permissions will be mirrored between Stream (Classic) and Stream (on SharePoint) : https://learn.microsoft.com/en-us/stream/streamnew/migration-details#permissions-and-destinations