
1. Getting started with Connectors for Office 365 Groups
Office 365 Connectors for Groups allows an out of box experience to the
users of Office 365 Groups to add integrations to their Office 365
Groups and are currently available for First Release customers.
Connectors are events which you can subscribe from your favorite apps or
services, such as when the subscribed events happens, then the apps
posts relevant information to your Group activity feed. Currently there
are over 50 built-in Office 365 connectors are available, some of the
built-in connectors for groups are Twitter, Github, RSS feeds and Trello

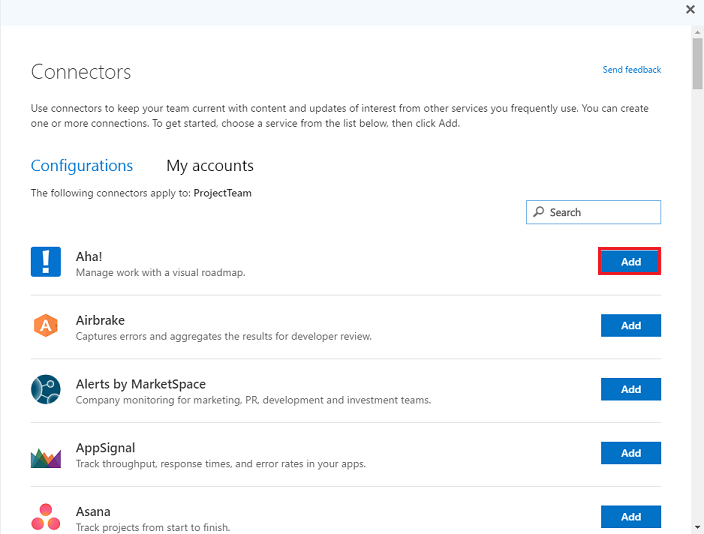
Any member in the group can either add or remove a connector from the
group. To add your required connectors to your group navigate to Outlook
on the web portal and browse one of your groups and you can select the
Connectors ribbon, which in turn lists the list of connectors, from
which you can add your required connectors to your group.
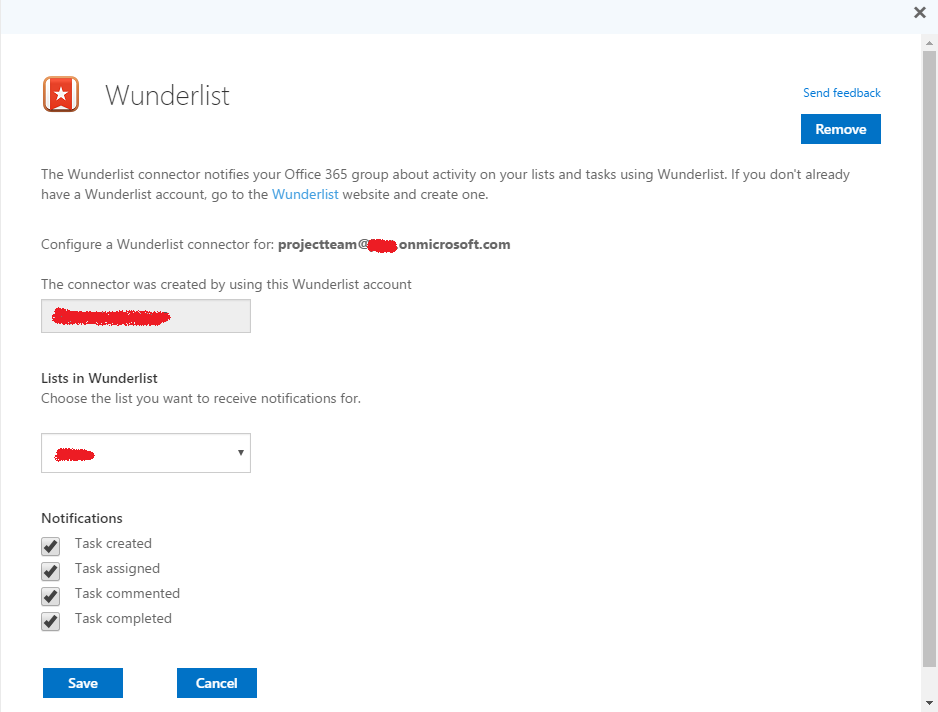
When you add an app or service to your group, everyone in your group can
see the messages delivered by that service. For example, if you want to
track and collaborate the project tasks in Wunderlist, then you can add
the Wunderlist connector
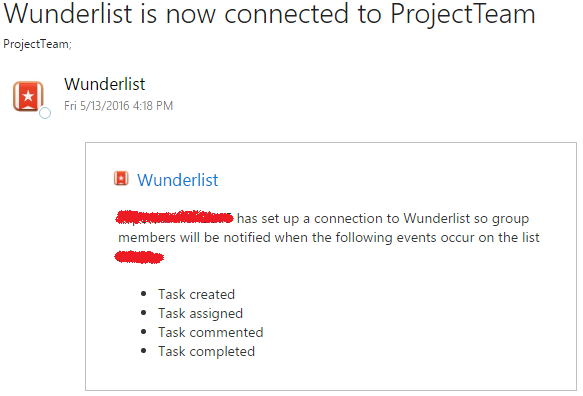
Once you have added Wunderlist connector to your Office 365 Group, all
the members of your group will receive the confirmation email.
Similarly, in future, the group members will receive notifications on
the activity on your lists and tasks using Wunderlist.
To remove a connector from Office 365 group navigate to Outlook on the
web portal and browse to the group where you want to remove the
connector and click the Connectorsribbon. Then click
Configuredand browse and locate the specific instance of the
connector to be removed and select View button for corresponding
connector
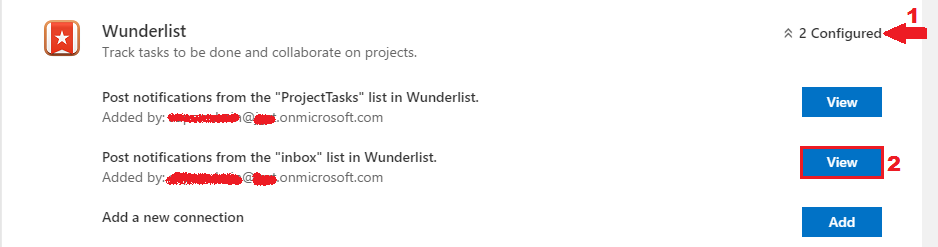
In the resulting screen, click Remove button to remove that
connector from your Office 365 group.

2. How to Disable or Enable Connectors using PowerShell
By default connectors are enabled for all Office groups in an Office 365
tenant. Global admins can use PowerShell to either disable or enable
connectors, either for a specific Office 365 Group or an entire tenant,
as a result all the users in that specific group or tenant will not
receive any further notifications.
Disable Connectors for a Specific Office 365 Group
Following PowerShell script is used to disable connectors for a Specific
Office 365 Group using Set-UnifiedGroup cmdlet.
$UserCredential = Get-Credential
$Session = New-PSSession -ConfigurationName Microsoft.Exchange -ConnectionUri
https://outlook.office365.com/powershell-liveid/ -Credential $UserCredential -Authentication Basic -AllowRedirection
Import-PSSession $Session
Set-UnifiedGroup -Identity ProjectTeam@tenant.onmicrosoft.com -ConnectorsEnabled:$false
After executing the above script, Connectors ribbon for that
specific Office 365 Group will be hidden from UI.

Disable Connectors for Bulk Office 365 Groups via CSV file
Following PowerShell script is used to disable connectors for bulk
Office 365 Groups via CSV file using Set-UnifiedGroup cmdlet.
$UserCredential = Get-Credential
$Session = New-PSSession -ConfigurationName Microsoft.Exchange -ConnectionUri
https://outlook.office365.com/powershell-liveid/ -Credential $UserCredential -Authentication Basic -AllowRedirection
Import-PSSession $Session
$filePath = "C:UsersXXXXDesktopo365Groups.csv"
$csv = Import-Csv $filePath
Foreach ($line in $csv)
{
Set-UnifiedGroup -Identity $line.Groupname -ConnectorsEnabled:$false
}
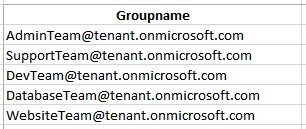
Sample CSV File
After executing the above script, Connectors ribbon for the list of
Office 365 Groups specified in the CSV file will be
hidden from UI.
Disable Connectors for an Entire Office 365 Tenant
Following PowerShell script is used to disable connectors for an entire
Office 365 tenant using Set-OrganizationConfig cmdlet.
$UserCredential = Get-Credential
$Session = New-PSSession -ConfigurationName Microsoft.Exchange -ConnectionUri
https://outlook.office365.com/powershell-liveid/ -Credential $UserCredential -Authentication Basic -AllowRedirection
Import-PSSession $Session
Set-OrganizationConfig -ConnectorsEnabled:$false
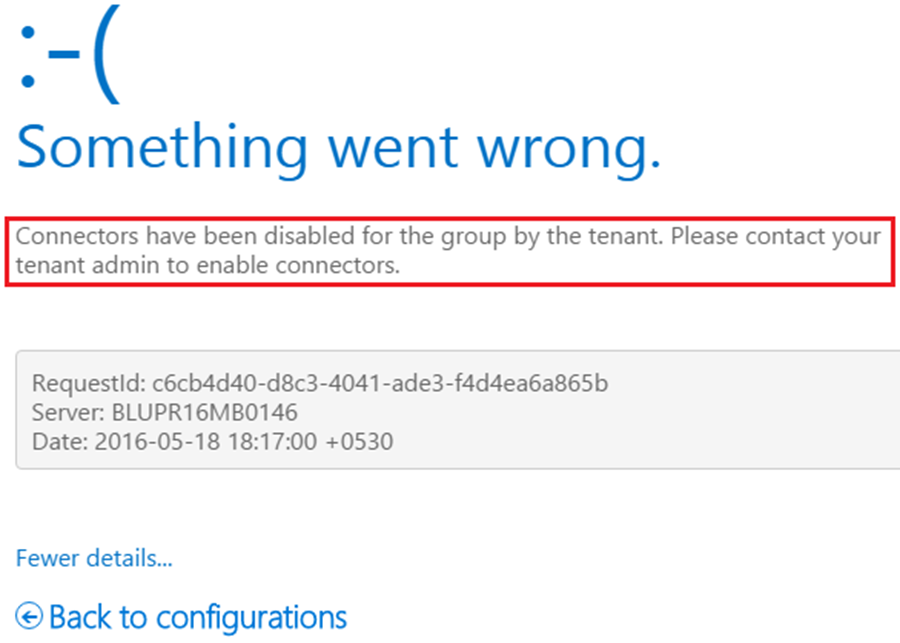
After executing the above script, there will be no change for Office 365
groups with “connectors disabled” – Connectors ribbon hidden from
UI. For groups with “connectors enabled” – Connectors ribbon will be
still visible, but when clicked displays the error – “Connectors have
been disabled for the group by the tenant…”, as shown in the below
screenshot, which is because the tenant-level setting for disabling
connectors overrides the group setting.
Enable Connectors for Office 365 Tenant or Office 365 Groups
To enable connectors for entire Office 365 tenant, change the
Set-OrganizationConfig cmdlet’s parameter – ConnectorsEnabled
value to $true. Once the connectors enabled for entire Office 365
tenant, there will be no change for Office 365 groups with “connectors
disabled”, but for groups with “connectors enabled” – when
Connectors ribbon clicked, it lists connectors and functions
normally.
Note:
If you wish to enable connectors only for specific Office 365 groups,
first you need to enable connectors for the tenant and then proceed with
enabling connectors for your groups.
For example, to enable connectors only for specific Office 365 groups in
a CSV file, follow the below PowerShell script,
$UserCredential = Get-Credential
$Session = New-PSSession -ConfigurationName Microsoft.Exchange -ConnectionUri
https://outlook.office365.com/powershell-liveid/ -Credential $UserCredential -Authentication Basic -AllowRedirection
Import-PSSession $Session
Set-OrganizationConfig -ConnectorsEnabled:$true
Get-UnifiedGroup | Set-UnifiedGroup -ConnectorsEnabled:$false
$filePath = "C:UsersXXXXDesktopo365Groups.csv"
$csv = Import-Csv $filePath
Foreach ($line in $csv)
{
Set-UnifiedGroup -Identity $line.Groupname -ConnectorsEnabled:$true
}