What is sensitivity Label?
Sensitivity Label is classifying and protecting document/email using the
label. Now sensitivity Label available from Office 365 Security and
compliance and it requires Office 365 E3/E5 license. Previously, same
functionality available in Azure Information Protection (Still Azure
Information Protection is available in Azure) and that required Azure
Information Protection premium license.
Why sensitivity label come into Office 365
Previously Azure Information Protection used to protect Office document
(Word, Excel, PowerPoint, Email) from the windows machine. Now it’s one
of part office 365 to help to protect the document from SharePoint
Online, OneDrive, Exchange Online, Office Online. So, Labeling moving
from Azure to Office 365 With E3/E5 License.
How to migrate AIP to Sensitivity label.
By default, when you create a new sensitivity label from Office 365
Security and compliance, it will create the same label into AIP. If you
modify existing label in AIP, you can update modification to Sensitivity
label using publish option. But if you modify existing sensitivity
label, it will not update to AIP.
How sensitivity label is working?
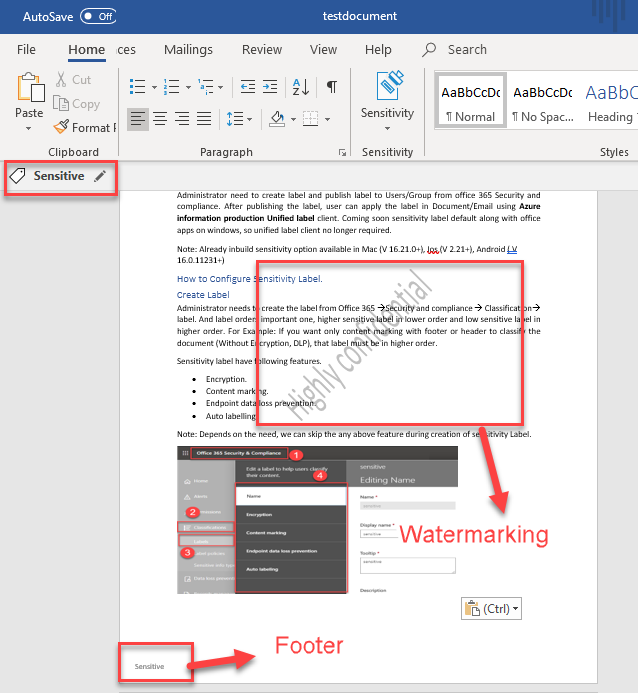
The administrator needs to create the label and publish label to
Users/Group from office 365 Security and compliance. After publishing
the label, the user can apply the label in Document/Email usingAzure
information Protection Unified label client. You can download the
Unified label client from
thislink
(download theAzInfoProtection_ul.exe file ). Coming soon
sensitivity label option default along with office apps on Windows and
Office online, so unified label client no longer required.
Note: Already inbuild sensitivity label option available in Mac (V
16.21.0+), iOS (V 2.21+), Android (V 16.0.11231+)
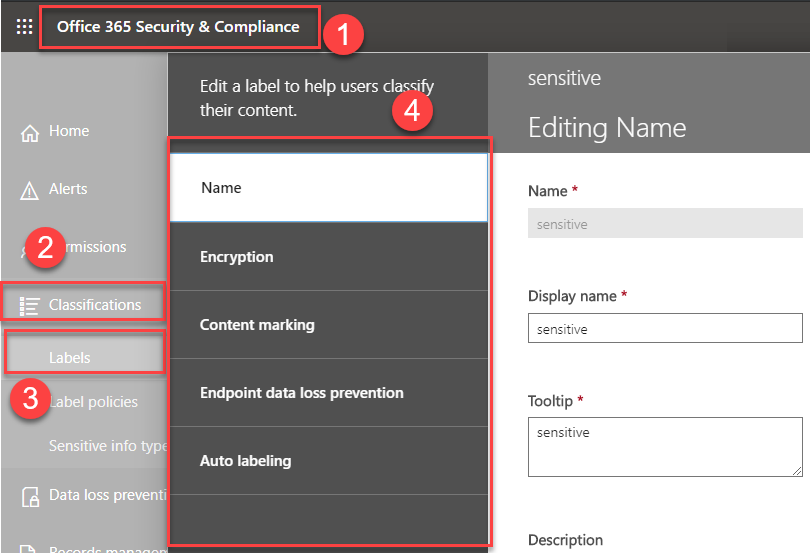
How to Configure Sensitivity Label
Create Label
Administrator needs to create the label from Office 365 Security and
compliance Classification label. And label orders are an important one,
higher sensitive label in the lower order and low sensitive label in
higher order. For Example: If you want only content marking with footer
or header to classify the document (Without Encryption, DLP), so this
label is low sensitivity label, that label must be in higher order.
Sensitivity label has the following features.
- Encryption
- Content marking
- Endpoint data loss prevention
- Auto labeling
Note: Depends on the need, we can skip any above feature during the
creation of Sensitivity Label.
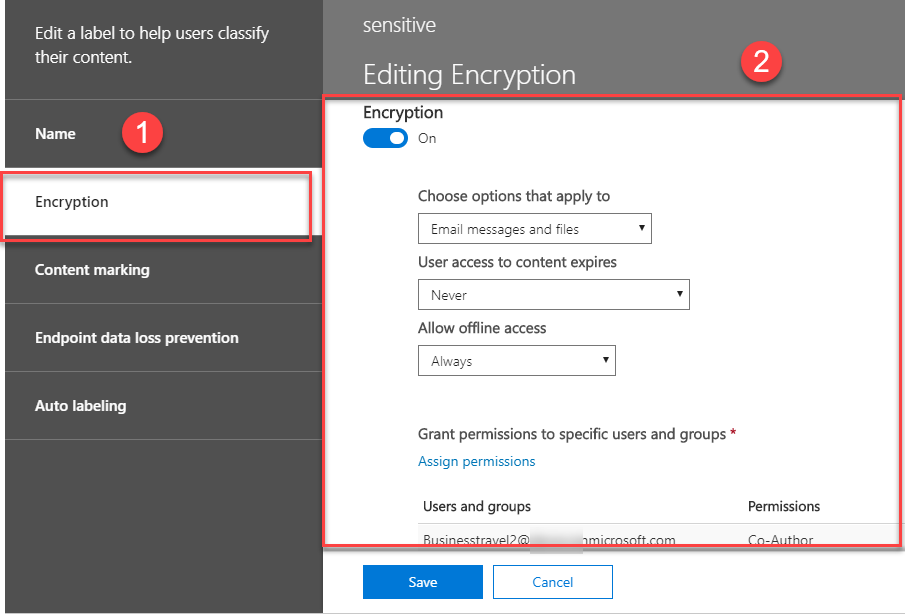
Encryption
Sensitivity Label usingAzure Rights management to encrypt the data.
Other than encryption it also has some important features that are
Access duration, Offline access, File access permission. If document not
more sensitive, we can skip the disable the Encryption. Azure
Information Protection is also using Azure Rights managementto
encrypt the data.
What we can encrypt
We can encrypt an only email or email and documents
Define access duration
We can define how long the labeled file can be accessed. After specific
days file access has been expired, so user access has been disabled for
this labeled file.
Offline access
We can define user can access the offline for Never, Always or only for
a number of days. if we define the number of days, user’s need to
re-authenticate to file access after specific days.
Who can access the encrypted file?
We can define which users can access the file with specific permission.
Also, it has the following option to define the users to access the
file.
- All tenant members
(All users in your tenant. This setting excludes guest accounts) - Add users and groups
(Any specific user or email-enabled security group, distribution
group, Office 365 group, or dynamic distribution group) - Add these email address or domains
(Any email address or domain outside your organization, such as
gmail.com, hotmail.com, or outlook.com)
It has following predefined permission level and we can define custom
permission to access the file.
- Co-owner
(View, Open, Read, Save, Edit Content, Edit, Copy, View Rights,
Change Rights, Allow Macros, Save As, Export, Print, Reply, Reply
All, Forward, Full Control) - Co-author
(View, Open, Read, Save, Edit Content, Edit, Copy, View Rights,
Allow Macros, Save As, Export, Print, Reply, Reply All, Forward) - Reviewer
(View, Open, Read, Save, Edit Content, Edit, View Rights, Reply,
Reply All, Forward, Allow Macros) - Reader
(View, Open, Read, View Rights, Reply, Reply All, Allow Macros) - Custom
Content marking
Mark the content used for classifying the documents (Word, Excel,
PowerPoint) and email. It’s used by Header, Footer, Watermarking
Header and footer are available for documents and email. Watermarking
only available for documents and not for email.
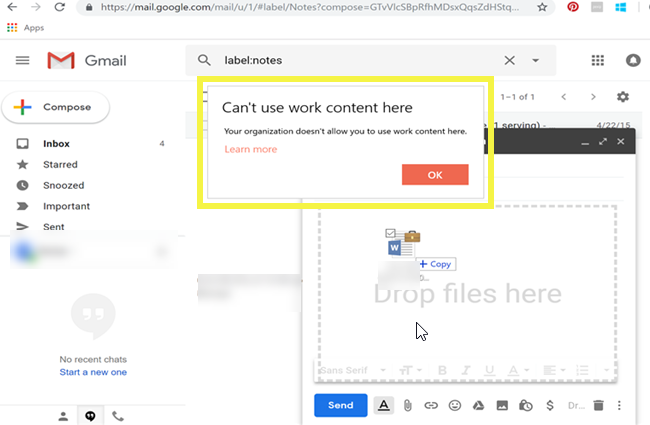
Endpoint data loss prevention
Data loss prevention (DLP) is used by Windows information protection to
prevent the document accidental leakage, with or without applying
encryption. WIP to prevent the copying to USB drives and prevent to
sharing of the data to any non-work location Like a personal OneDrive,
personal email accounts, social media.
This example prevents to send a file from the personal Gmail account.
Prerequisites
Before going to see the DLP (WIP) in Sensitivity label, we need to check
prerequisites of DLP (WIP) in Sensitivity label.
This example prevents to send a file from the personal Gmail account.
- Create a label with DLP enabled from office 365 Security and
compliance - Windows 10 machine with 1089 update and more.
- Windows 10 Machine need Windows Defender ATP, it will help to find
the labeled file and apply the WIP policy.
How WIP works with Sensitivity Label
If you create a sensitivity label with Data loss prevention enabled.
That label can be applied manually or apply automatically using auto
labeling to document. Once label applied to document in windows 10
machine, Windows Defender Advanced Threat Protection automatically scan
any DLP enabled document. Windows Defender ATP triggers the WIP policy.
WIP policy protects the document.
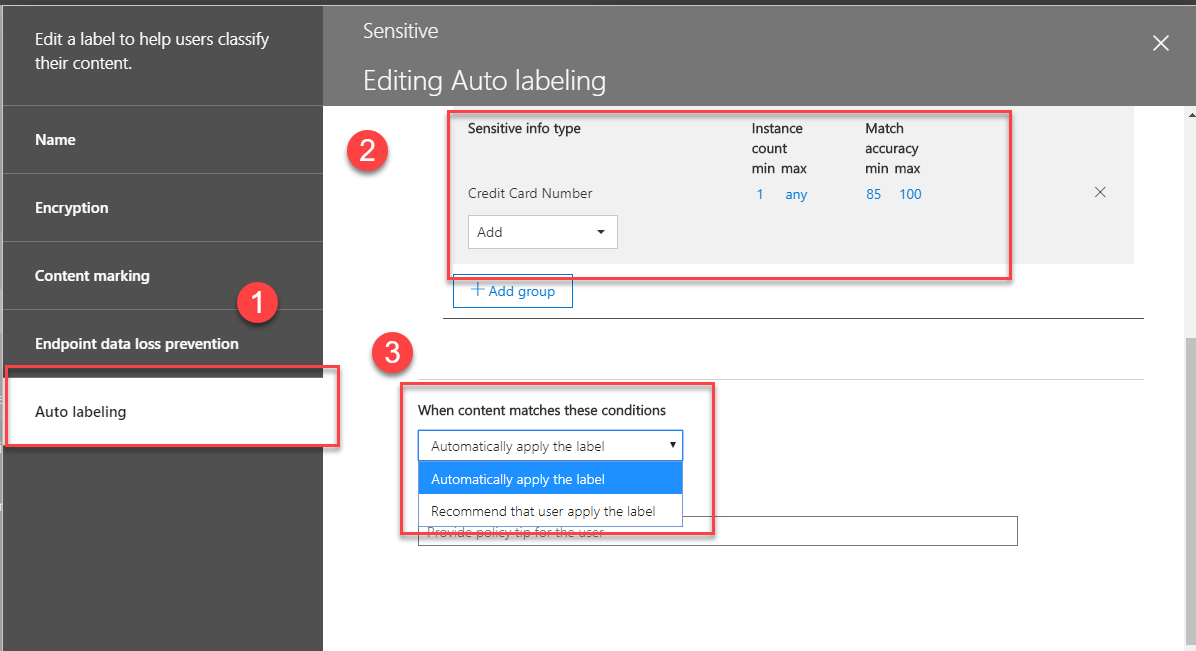
Auto labeling
Before going to see the auto labeling, we need to check prerequisites of
auto labeling.
Prerequisites
- Create a label with Auto labeling enabled from office 365 Security
and compliance. - Auto labeling required Azure Information Protection P2 license.
- Windows 10 Machine with Azure information protection unified
labeling client tool.
Note: Auto labeling function not available in other then windows OS
like Mac, iOS, Android
How auto labeling is works
Auto labeling working based on sensitive type information store (Credit
card number, Account number) in the label. Unified labeling client will
check when open the file, it will apply the label automatically or show
the recommended message to change the label. It based on the
configuration in the sensitivity label.
Label policies
Now Label is created successfully, but that label will not reach the
users in your organization. So, we need to publish the label and define
who can access the label. This process called label policies. Using
label policy, we can publish one or more label and we need to define
which user can access this label and we can define which label is
default label. Another important feature in label policy is User
Justification if the user removes label or change label to low
classification level, the user needs to provide the justification
regarding this action.
Note: When you define label policy permission, you need to ensure
label encryption permission users/group is existing in label policy
permission.
Label policies order
It’s like to sensitivity label, Label policies order is help to
priorities the policy. Higher priority label policy is shown in low
order and lowest priority label is shown in higher order in the label
policies.
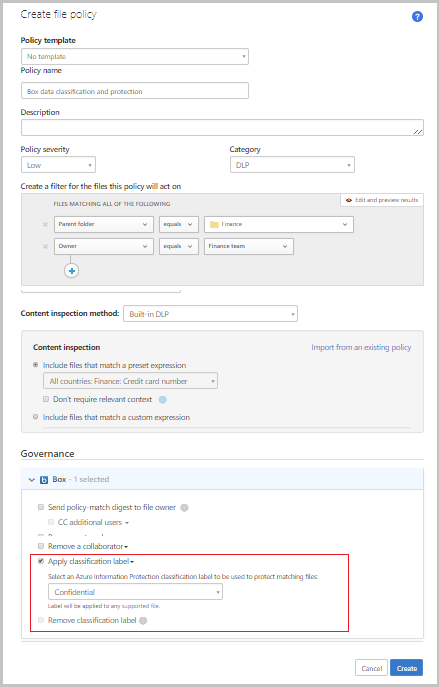
How to protect the document in third-party apps using sensitivity label
Already Microsoft cloud app security is used for discovering and
auditing the document from third-party apps like Box, Dropbox, Google
suite. Now cloud app security supports sensitivity labeling. Using cloud
app security (file policy), it will automatically apply the sensitivity
label to documents in the third-party app. Based on the sensitivity
label, it’s automatically applying the encryption to the document, so it
will help to more protect your document in the third-party app location
How to create cloud app security policy with the sensitivity label
We need to create new file policy from Control Policy File policy
Governance and select the required app (Box, Dropbox, Google suite) and
enable classification and select the required label.
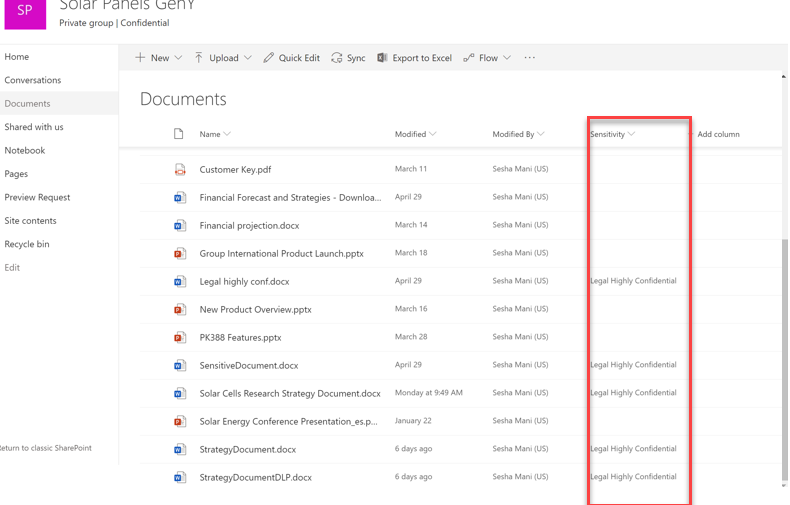
How to protect the SharePoint site Documents using sensitivity label
Microsoft recently announced sensitivity label supporting SharePoint
Online Document and this feature under private preview. In this private
preview, it has the following features.
- We can access the labeled (sensitivity labeled) documents from
SharePoint online and OneDrive. - Sensitivity label will continue when downloading the labeled
document from SharePoint online and OneDrive. - Now user can open, edit the labeled document from SharePoint online/
OneDrive using Office online. (support sensitivity labels from
Office online is already in plan) - Office 365 eDiscovery supports the full-text search of protected
documents. Data Loss Prevention (DLP) policies can now work with the
contents of these documents (such as credit card numbers within
documents).
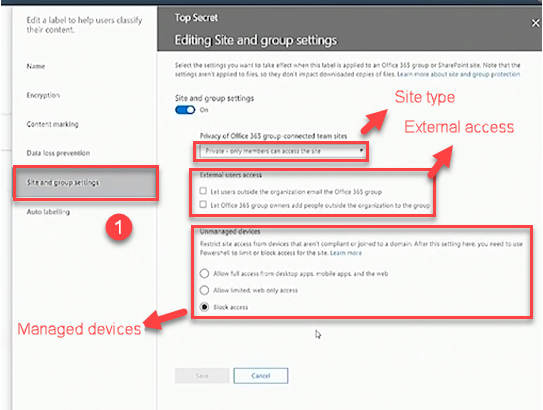
How to protect the SharePoint site using sensitivity label
Microsoft recently announced sensitivity label supporting SharePoint
Online site and this feature under private preview. In this private
preview, we can classify site using the sensitivity label.
Sensitivity label supporting the following features in SharePoint Site.
- Label the entire site for the user to identify how the site is more
important. - Using this Label, we can define the site type (Public or Private).
- We can manage external access using this label.
- We can manage device access using this label. (If this setting is
enabled with Block access, after that user access from the unmanaged
device, site access is automatically blocked.)
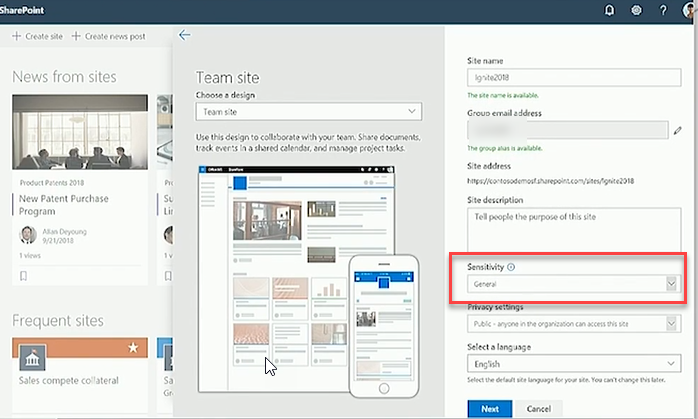
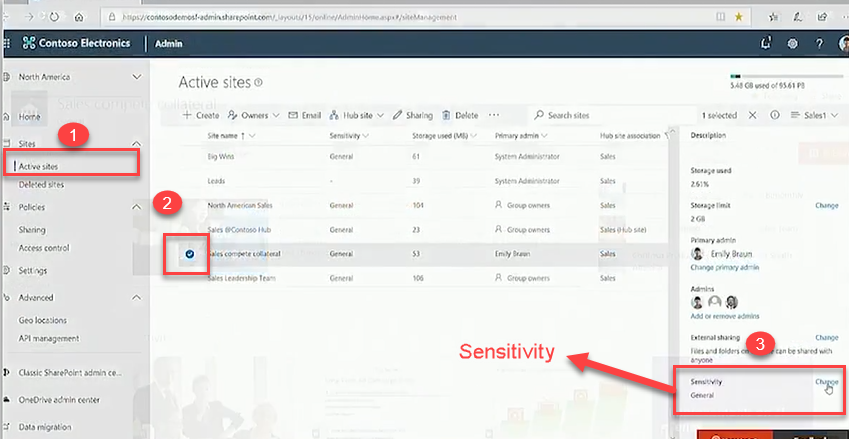
How to apply sensitivity label to SharePoint site
You can apply the sensitivity label during site creation. Also, you can
manage site sensitivity from SharePoint admin centerActive sites Select
required site site properties Sensitivity.
Site creation
Manage Sensitivity from admin center
More information refers the following links.